I periodically get emails about setting up a sandblaster, and it thought it would be helpful to others if I shared my response here as well. The question centered around placing a sandblasting cabinet outdoors in South Florida.
There's no reason that you can't have a sandblaster on a covered porch or under a car port. The real challenge will be controlling moisture, both from the ambient air and the condensed moisture in the compressed air. Liquid water in the air lines will create clumps in the abrasive, so you'll want to add a water trap at the compressor outlet.
If you're only doing surface etching and cleanup, you don't need a pressure pot, just a cabinet with a siphon blaster. I would recommend a TP Tools cabinet. They've been building cabinets for years. http://www.tptools.com/Home-Shop-34-W-S ... inets.html
They used to have a very small cabinet, but their smallest is now the 780-TL. It's a great cabinet and I've set up a number of them for glass friends. The Harbor Freight cabinet is okay if you take the time to seal every seam as it's being assembled... Otherwise, it leaks terribly dropping abrasive and blowing dust out of its corners.
You'll need a dust collector (also from TP Tools) and a compressor. TP Tools makes a very good, very simple dust collector, but they also sell a HEPA filter as an option. This really keeps the dust from leaving the cabinet. http://www.tptools.com/VAC-45-HEPA-Vacu ... l?b=d*8035
Sears is a good source for compressors. Home Depot as well. I don't have any experience with Lowe's compressors. If you have the money, an Ingersol-Rand compressor can be purchased at Grainger or ordered from Northern Tools. They're reliable but a bit pricey. I would stay away from Harbor Freight and Northern Tools house brands just because of quality concerns, but you need to be the judge of how tolerant you are for periodically replacing your equipment. You won't need a big 60 gallon upright, but a 27-30 gallon upright compressor should give you decent service at a reasonable cost. Like many things, you should buy the largest compressor that you can afford. In this case, compare the flow (CFM) at 90 psi (close to the operating pressure of a siphon blaster); more is better. The larger the tank, the less frequent the tank will need to cycle. Same goes for tank pressure; a 150 psi compressor holds more air than a 120 psi compressor with the same size tank.
All that's left is the abrasive and the hose. 120 grit silicon carbide or aluminum oxide will both work well. Plan on setting up your cabinet with 25 lbs of abrasive, but you might want to buy 50 lbs to have enough to get the level up if the cabinet has a large hopper.
Buy the shortest hose that you can get away with. The compressor will be noisy, so you might need enough hose to locate the compressor in another room or around the corner.
You'll also need a five gallon pail or large tray so that you can periodically screen your abrasive. The cabinets have a trap door at the bottom of the hopper that works well for this purpose. TP Tools sells a screen for a few dollars that is designed for this purpose.
Anyway, good luck. Let me know if you have any other questions.
Tony
Setting up a sandblaster
Moderators: Brad Walker, Tony Smith
-
Tony Smith
- Posts: 1037
- Joined: Sun Mar 09, 2003 5:59 pm
- Location: Massachusetts, USA
- Contact:
Setting up a sandblaster
The tightrope between being strange and being creative is too narrow to walk without occasionally landing on both sides..." Scott Berkun
Re: Setting up a sandblaster
Fabulous, Tony. And if you're buying a pressure pot blaster, which would you recommend?
(thanks!)
(thanks!)
Cynthia Morgan
Marketeer, Webbist, Glassist
http://www.morganica.com/bloggery
http://www.cynthiamorgan.com
"I wrote, therefore I was." (me)
Marketeer, Webbist, Glassist
http://www.morganica.com/bloggery
http://www.cynthiamorgan.com
"I wrote, therefore I was." (me)
-
Tom Fuhrman
- Posts: 187
- Joined: Mon Mar 10, 2003 11:44 am
- Location: eastern Tennessee
- Contact:
Re: Setting up a sandblaster
Tony: good info.I've been using a TP cabinet and blasters for many years. I use their siphon and pressure pot. My only complaint is that if you don't use any of the different systems on a regualr basis, it requires a fair amount of maintenance to keep them operating properly. The moisture trap is of great importance, get the best you can afford. My pressure pot always clogs up at the bottom when I don't use it for a month or so. Then I have to clean it all out. Keeping the particulate free from moisture is aways a problem. The best thing is to use it everyday and it will work better.
-
Tony Smith
- Posts: 1037
- Joined: Sun Mar 09, 2003 5:59 pm
- Location: Massachusetts, USA
- Contact:
Re: Setting up a sandblaster
Hi Cynthia. My recommendation for a pressure pot system is everything above, plus a Glastar 100B-S. http://www.glastar.com/catalog/sandblas ... asters.cfm
It's an easy add-on and it uses a fraction of the air a siphon system uses.
Tony
It's an easy add-on and it uses a fraction of the air a siphon system uses.
Tony
The tightrope between being strange and being creative is too narrow to walk without occasionally landing on both sides..." Scott Berkun
-
Tony Smith
- Posts: 1037
- Joined: Sun Mar 09, 2003 5:59 pm
- Location: Massachusetts, USA
- Contact:
Re: Setting up a sandblaster
It's interesting, TP Tools made the original Glastar pressure pot, and still makes some of their cabinets.Tom Fuhrman wrote:Tony: good info.I've been using a TP cabinet and blasters for many years. I use their siphon and pressure pot. My only complaint is that if you don't use any of the different systems on a regualr basis, it requires a fair amount of maintenance to keep them operating properly. The moisture trap is of great importance, get the best you can afford. My pressure pot always clogs up at the bottom when I don't use it for a month or so. Then I have to clean it all out. Keeping the particulate free from moisture is aways a problem. The best thing is to use it everyday and it will work better.
I've never let my system sit that long, so I've never had to clean it out, but I've had to do that for friends. Not fun. Good advice though... Get a really good water separator.
Tony
The tightrope between being strange and being creative is too narrow to walk without occasionally landing on both sides..." Scott Berkun
Re: Setting up a sandblaster
or move to a place without that nasty thing called humidity. i've never had to clean out my pressure pot, in about 10 years of using it with sometimes months between uses.
-
Valerie Adams
- Posts: 587
- Joined: Mon Apr 19, 2004 2:49 pm
- Location: Santa Rosa, California
- Contact:
Re: Setting up a sandblaster
So I've recently bought this mid-sized Rayzist system, which says it has a moisture trap for the pressure pot. I've also just bought a compressor but haven't added a moisture trap between the blasting unit and the compressor. I anticipate using the sandblaster only now and then. Do I need an additional part?Tony Smith wrote:...so I've never had to clean it out, but I've had to do that for friends. Not fun. Good advice though... Get a really good water separator.
Tony
http://www.rayzist.com/store/Sandcarvin ... 034vxa.php
Re: Setting up a sandblaster
I'll add a little about water separation. You can buy air filters / water separators to put in the air line ahead of your blast cabinet and they can help a lot but they are really most effective when the air is cool.
When air comes out of the compressor it's usually quite hot and it can hold a lot of moisture. As the air cools the moisture condenses out, so one of the things you want to do is cool the air as much as possible before it gets to the water separator so the separator can eliminate as much moisture as possible before it gets to your blast cabinet.
One of the easiest ways to cool the air is to put the compressor some distance from the work area and use 1/2" copper pipe to plumb the air to the desired location. The copper is a good conductor of heat and 20-30' of pipe will cool the air considerably on its way to it's destination. At the end of the copper run have a vertical section of pipe with a tee in it and a down leg with a valve. Condensed water droplets will tend to continue downwards into this "trap" instead of turning the corner to make the horizontal run. Once in a while you can open the valve and drain any water out of the trap. It should look like this, and it works quite well for low cost:
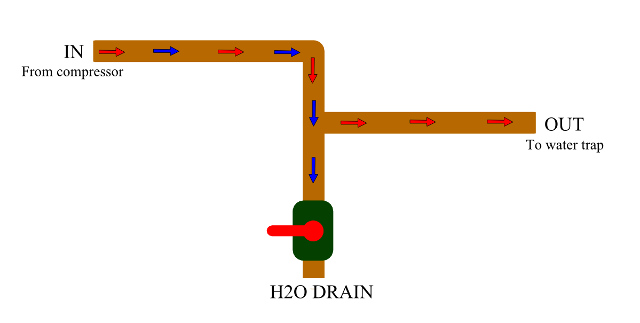
Just using a long run of copper pipe and the trap shown above will go a long way towards removing as much water as possible before it gets to your filter/separator.
When air comes out of the compressor it's usually quite hot and it can hold a lot of moisture. As the air cools the moisture condenses out, so one of the things you want to do is cool the air as much as possible before it gets to the water separator so the separator can eliminate as much moisture as possible before it gets to your blast cabinet.
One of the easiest ways to cool the air is to put the compressor some distance from the work area and use 1/2" copper pipe to plumb the air to the desired location. The copper is a good conductor of heat and 20-30' of pipe will cool the air considerably on its way to it's destination. At the end of the copper run have a vertical section of pipe with a tee in it and a down leg with a valve. Condensed water droplets will tend to continue downwards into this "trap" instead of turning the corner to make the horizontal run. Once in a while you can open the valve and drain any water out of the trap. It should look like this, and it works quite well for low cost:
Just using a long run of copper pipe and the trap shown above will go a long way towards removing as much water as possible before it gets to your filter/separator.
Steve
-
Tony Smith
- Posts: 1037
- Joined: Sun Mar 09, 2003 5:59 pm
- Location: Massachusetts, USA
- Contact:
Re: Setting up a sandblaster
I have a moisture trap at the compressor and another at the pressure pot. That's the approach I would recommend for anyone setting up a system in an area with moderate to high humidity.Valerie Adams wrote:So I've recently bought this mid-sized Rayzist system, which says it has a moisture trap for the pressure pot. I've also just bought a compressor but haven't added a moisture trap between the blasting unit and the compressor. I anticipate using the sandblaster only now and then. Do I need an additional part?Tony Smith wrote:...so I've never had to clean it out, but I've had to do that for friends. Not fun. Good advice though... Get a really good water separator.
Tony
http://www.rayzist.com/store/Sandcarvin ... 034vxa.php
Tony
The tightrope between being strange and being creative is too narrow to walk without occasionally landing on both sides..." Scott Berkun
-
Valerie Adams
- Posts: 587
- Joined: Mon Apr 19, 2004 2:49 pm
- Location: Santa Rosa, California
- Contact:
Re: Setting up a sandblaster
Thanks Tony.
Since I'm in a fairly dry climate I think I'll give it a go without for now and see if I have any issues.
Since I'm in a fairly dry climate I think I'll give it a go without for now and see if I have any issues.
Re: Setting up a sandblaster
I have used a sandblaster for about 41 years. I have always had a desiccant filter. It is more than a valve to open and let water out, it filters out the water and anything else that might be there. You can dry them in your oven on low to remove moisture or buy a new one. I swear by them. You can use more than one also, if you think you need to. I have one on my compressor as the air leaves and another just before my pressure pot. If I use the air for something other than sandblasting then it is dry and I figured that I had one in line to the blaster before I got the pressure pot, so I'd leave it.
It does not solve the problem that others have spoken of about the pressure pot sand becoming clumped. As the pot sits in my unheated garage and the abrasive can get dampish. I do try to do "do dilligence" on my maintenance, but I often go months without using the blaster, as my focus is not on blasting any longer, but more on fusing.
The only other thing I'd add is to get a foot valve/petal for on and off. I don't have one. I've used many different ways, but as money was always an issue I just couldn't afford one and I often don't remember to work on it if I'm not using it. For long periods of sandblasting my hands would cramp. Now I have bad arthritis and can not hold a gun easily, so I'll need to get that foot valve/petal soon.
Good luck to all the newbies in blasting. And FYI, one need not purchase their equipment. I made my blasting cabinet out of cast off T-111 plywood; a fatigue jacket and caulk. The jacket is where I place my arms; I caulked the cracks and the plywood was a mismash of cast off building supplies. The grate is from a cool air return that was in our floor. If I had to do it over I'd paint the hopper in the bottom before assembly with high gloss enamel to encourage the abrasive to slide on down. It grips the plywood and I need to push it down when reloading my pressure pot.
We who etch glass have a blast! Hope you do too.
Re: Setting up a sandblaster
When I lived on the Raincoast I, too, had the moisture/clumping problem despite having appropriate moisture traps until I changed three things. The first was to increase the the length of the air line to allow condensate to form before the air reached the trap.
The second was to have the line drop towards the trap so residual moisture still trickled to the trap even while it was not under pressure.
The third and probably most effective, was to place a 40 watt bulb under the bottom valve of the pressure pot. The warmth it generated was enough to keep the media dry. (Inexpensive, simple and effective. The bulb does need to be powered ). Jen
The second was to have the line drop towards the trap so residual moisture still trickled to the trap even while it was not under pressure.
The third and probably most effective, was to place a 40 watt bulb under the bottom valve of the pressure pot. The warmth it generated was enough to keep the media dry. (Inexpensive, simple and effective. The bulb does need to be powered