Page 1 of 1
Which fusing schedule should I use to keep crisp lines?
Posted: Tue Sep 16, 2014 12:11 pm
by Anne Marie Flaherty
Hello
I am making a 20inch table top. The design is Art deco, and I'd like to keep the lines crisp and straight rather than fully fused and soft. I would like the glass to be primarily smooth as it is to be used as a table. I use Spectrum 96 , not sure if I should Contour fuse or Tack fuse? Any suggestions?
Attached is a pic of the table before firing, you can see why I'm trying to keep the lines crisp. Any comments welcome-
Thanks so much!
Re: Which fusing schedule should I use to keep crisp lines?
Posted: Tue Sep 16, 2014 3:30 pm
by linn keller
Hi,
Looking at your photo, it appears that there are different thicknesses of glass in your design. A tack or contour fuse will "glue" the glass together, but will not result in a smooth surface: if that's the case - the different pieces will still be sitting on top of each other. A flip and fire, full fuse, will let you use the bottom surface as the top and should help keep lines crisp, but if the design is not the same on the bottom as the top, then you won't have the same look in the finished piece. Are you fusing onto a solid second sheet to give you a 6 mm thickness? I think I'd do flip and fire with a second full layer of clear to achieve your look.
Linn
Re: Which fusing schedule should I use to keep crisp lines?
Posted: Tue Sep 16, 2014 4:16 pm
by Anne Marie Flaherty
HI Linn,
Thank you for the suggestion. The colored glass is sitting on top of a clear base and yes there are a couple higher levels because they are stacked. I've never heard of a flip and fuse-is that literally turning the piece over and firing it that way. If you full fuse, would you go up 1460 and hold for 20minutes?
Thanks
Re: Which fusing schedule should I use to keep crisp lines?
Posted: Tue Sep 16, 2014 5:44 pm
by Morganica
This is a volume and viscosity issue. As the glass fuses together, it will soften, sag and spread. The spreading pushes the lines between the glasses out from the center, radially, so that the formerly straight lines distort. The "softer" glasses (those that get runnier at lower temps, such as black) will move faster than harder glasses (such as white), increasing the distortion. On top of that, the shelf is cooler than the top surface and the glass at the bottom has the weight of the top glass pressing down, so it won't move as fast. That means you'll also get some diagonal distortion in a cross-section of the glass, and that can add to surface distortion.
Plus, the more layers you stack on top, the more spreading you're going to get with a flat fuse...and so the more your lines will distort. There are a few ways to minimize this:
1) The "flip n' fire" method Linn suggested. You literally build your piece upside down, starting at the kilnshelf, and take advantage of the fact that the insulated glass against the kilnshelf won't spread as much. Since the underside will pick up texture from the kilnshelf (and can also pick up stray dust/fiber paper crumbs from the shelf), it won't be as shiny as the top surface. You can either use the matte finish as-is, or flip the piece over and fire a second time to polish that surface. (that's the "flip" in flip n' fire) For the best possible surface, it's a good idea to either sandblast the piece lightly, or hand-sand it with maybe 400-grit wet-dry sandpaper (clean WELL before firing), to remove any embedded shelf particles.
2) Don't nuke the glass. The hotter/longer you fire the glass, the more it's likely to spread. Fire only as long as you need to achieve the desired look. This isn't going to prevent distortion, but it will lessen it, especially if you have combined a lot of softer and harder glasses. The longer you fire a black and a white together, the more wavery the lines will become.
3) Dam it. If any part of your layup measures more than 6mm thick, you can contain it somewhat by preventing it from spreading. Line firebrick, mullite kiln furniture, steel enclosures, whatever, with fiber paper, snug them up against the edges of your glass, and make sure they're strongly supported. They'll keep the glass from moving so much. Again, this won't completely prevent the lines from distorting, but it will help.
Re: Which fusing schedule should I use to keep crisp lines?
Posted: Tue Sep 16, 2014 6:16 pm
by Anne Marie Flaherty
Thank you Morgan-
I will fire lightly and not hold it for too long.
Thank you very much for the lesson!
Take care
Re: Which fusing schedule should I use to keep crisp lines?
Posted: Wed Sep 17, 2014 10:31 am
by David Jenkins
It looks to me (can't really tell from the image) like you might have a gap in the design pieces. If so, I'd take pains to remove the possibility of a bubble if you Flip 'n Fire.
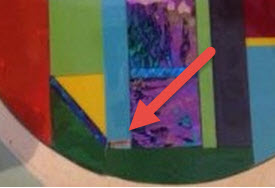
- gap.jpg (12.14 KiB) Viewed 9789 times
Re: Which fusing schedule should I use to keep crisp lines?
Posted: Sun Sep 21, 2014 5:18 pm
by Marian
How did the project turn out? Success or not as expected? It was a very striking lay out to start.