Page 1 of 2
Adding a rim to future bowls
Posted: Wed Sep 25, 2013 3:17 am
by S.TImmerman
Hi,
I have my pulley system set up (finally) for my clam shell and I would like to do some raking of glass. I have two designs in mind and I would like to add a rim after I rake the glass. I can't seem to find any notes on doing this. Do you cut two rimes out and what is the best way to set these up to fuse them to the raked glass? I'll rake in SS 12 in circles. How much overlap should I allow for? I realize I can't butt them up to the finished circles.
As for cold working the raked disks( before adding the rims), is using a belt sander the best way?
I've searched high and low though all my books and could not find anything.
Thank you! Very much
Sheree
Re: Adding a rim to future bowls
Posted: Wed Sep 25, 2013 11:54 am
by jim burchett
I think Patty Grays site probably has information on this
Re: Adding a rim to future bowls
Posted: Wed Sep 25, 2013 5:05 pm
by Laurie Spray
I would clean up the raked piece till perfect.....lay it on a disk of clear the size of the finished piece then add a rim of the rim color......fire it slow on the heat up. I fire something like that at 100 degrees/hr to 800 and then up.....
Patty does have a tutorial on making rims......
Re: Adding a rim to future bowls
Posted: Thu Sep 26, 2013 12:01 am
by Barb R
Re: Adding a rim to future bowls
Posted: Thu Sep 26, 2013 2:00 am
by S.TImmerman
Laurie Spray wrote:I would clean up the raked piece till perfect.....lay it on a disk of clear the size of the finished piece then add a rim of the rim color......fire it slow on the heat up. I fire something like that at 100 degrees/hr to 800 and then up.....
Patty does have a tutorial on making rims......
Thank you for the link and info about patty grays site
Laurie, thanks for the schedule too, quick question.. If I did place my racked piece on top of a clear piece ..extending it to go under the rim I make. Wouldn't I need to make two rims if the raked piece is now three layers ? I was under the impression you needed to make a 6mm to rake.
I really appreciate the help!!!!
Re: Adding a rim to future bowls
Posted: Thu Sep 26, 2013 11:19 am
by Laurie Spray
Another simpler way to do this is to put down 2 full circles of your large glass circles......one color with a clear on top or what ever combo you want and just place your clean combed piece in the center. It does make for a heavy piece but when doing a rim... if the fit is off a little bit it can have an unsightly space. On our site under tutorials there is something about this on the pot melt tutorial and a photo of a piece done that way. Do a good hold at the top temp to smooth it all out. The center will probably still be thicker than the 2 layer lip but it has never caused a problem for me. Again....this is a lot of glass so you need to heat it up
very slow The more you care about it the slower you should go!!

Also I would anneal 3 hours at anneal temp before starting a slow cool down. We are now making stands that are perfect for a piece like this!!
Hope this helps! now back to coffee!
Re: Adding a rim to future bowls
Posted: Thu Sep 26, 2013 5:31 pm
by Jerrwel
S.TImmerman wrote:Hi,
I have my pulley system set up (finally) for my clam shell and I would like to do some raking of glass. I have two designs in mind and I would like to add a rim after I rake the glass. Sheree
I've never done this but have thought about making rims on glass since I saw beautiful rims on Ann Wolff's work
http://www.toledomuseum.org/kiosk/moder ... dio-glass/. I believe her rims are made using glown glass techniques though.
Sooooo, in watching and thinking I kinda' remember someone doing rims with a stainless steel ring such as those produced by Laurie Spray
http://bonnydoonfusedglasstools.com/rin ... rn-bars-1/, properly lining the ring on a prepared surface, centering the subject within the ring, and filling the space between the ring and the subject object with frit sufficient to make the ring and then fire slowly to create the ring without distorting the original piece. The big advantage (if this works) is that the frit should mold to the original, combed piece without any gaps so as to minimize the effect of any imperfections in the original's edge.
I'd use a very conservative ramp up and anneal schedule. As always suggesting the use of Graham Stone's book,
Firing Schedules for Glass,
http://www.warmglass.org/books/books/126-fsg to develop your schedule.
Re: Adding a rim to future bowls
Posted: Thu Sep 26, 2013 6:54 pm
by Laurie Spray
You could do it that way Jerry.....but for me I like a defined line for the rim like in this pic. If I had fired the pot melt with black frit around it the edge would have come out less even around the orange center.....does that make sense.....? You would also have to cold work the edge to do a slump.
This one was a 18" round of black capped with an 18" of clear with the pot melt in the center......
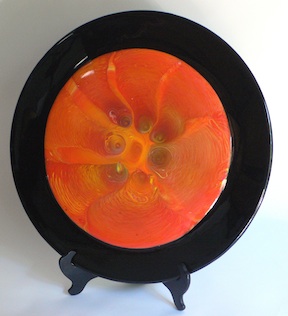
- cropped orange potmelt sm.jpg (30.38 KiB) Viewed 21113 times
Re: Adding a rim to future bowls
Posted: Fri Sep 27, 2013 4:46 am
by S.TImmerman
I have a welder friend who made me 10 SS heavy gauge circles and it took him about an hour to do with his equipment. From 7" on up to 17" inch. I really like the defined edge too! I really appreciate the help Laurie. I want to add one to my rod disk as well. I think it will offset the colors nicely. I pulled the rods.
Thank you very much!!
Re: Adding a rim to future bowls
Posted: Sat Sep 28, 2013 9:58 am
by Pat K.
I've made rims to go around a combed glass circle. My center was placed inside one of Laurie's ss rings, fired and combed. This kept the edges very even. When it was done, I cut three separate rings, usually two clear, and one color to match. They were then placed around my combed piece, refired very slowly, and then slumped. This uses a lot of glass but I use the clear circles for my base layer in the next piece. I score both lines before breaking out the circle; it's delicate work and I can't say that I'm always successful. If I can find a picture of one, I'll try to post it.
Patty
Re: Adding a rim to future bowls
Posted: Sat Sep 28, 2013 1:58 pm
by Jerrwel
Laurie Spray wrote:This one was a 18" round of black capped with an 18" of clear with the pot melt in the center....
Gorgeous, Laurie; and yes the process makes sense. I feel sorry for all those cats that people find different ways to skin (Yuck).
Re: Adding a rim to future bowls
Posted: Sat Sep 28, 2013 2:03 pm
by Jerrwel
Pat K. wrote:I've made rims to go around a combed glass circle. My center was placed inside one of Laurie's ss rings, fired and combed. This kept the edges very even. When it was done, I cut three separate rings, usually two clear, and one color to match. They were then placed around my combed piece, refired very slowly, and then slumped. This uses a lot of glass but I use the clear circles for my base layer in the next piece. I score both lines before breaking out the circle; it's delicate work and I can't say that I'm always successful. If I can find a picture of one, I'll try to post it.
Patty
Patty, I've tried making rings by cutting out the center too with about 5% success using various manufacturers' glass; one well-known glassing instructor told me that Spectrum glass gives the best, consistent results in cutting rings and to my experience that seems to be true.
Re: Adding a rim to future bowls
Posted: Sun Sep 29, 2013 12:42 pm
by Pat K.
Yes, Jerry, you're right. Anytime I've done this, I've used Spectrum. It seems like I've cut hundreds of circles but probably not

When I do cut Bullseye circles, it's with a prayer and a wish. The last one I tried a week ago, it went its own way.

I was able to make one since I hadn't cut anything else off the sheet. I repositioned, scored, and cut straight pieces right above the score lines, then did the score for the circle. It worked.
Patty
Re: Adding a rim to future bowls
Posted: Sun Sep 29, 2013 1:12 pm
by Brock
You just have to learn to cut glass . . .
Re: Adding a rim to future bowls
Posted: Sun Sep 29, 2013 6:35 pm
by Valerie Adams
Jerrwel wrote:
Patty, I've tried making rings by cutting out the center too with about 5% success using various manufacturers' glass; one well-known glassing instructor told me that Spectrum glass gives the best, consistent results in cutting rings and to my experience that seems to be true.
I'm not a 'well-known' glass instructor but I can tell you one thing; my beginning students learn how to cut beautiful circles during our first class. They're cutting rings on day two. It's really all about technique and practice.
Re: Adding a rim to future bowls
Posted: Sun Sep 29, 2013 7:47 pm
by David Jenkins
Valerie: What size dia. circles and rings do you have them cutting first day?
Re: Adding a rim to future bowls
Posted: Sun Sep 29, 2013 8:26 pm
by Valerie Adams
David Jenkins wrote:Valerie: What size dia. circles and rings do you have them cutting first day?
We start with 10" float glass circles by hand. After I show them they can proficiently cut a nice circle without a circle cutter, they progress to using circle cutters on float, again cutting 8 to 10" circles. Once they've cut a couple, I give them transparent Bullseye. The next day, those who want to, take the larger float circles and practice cutting rings.
Re: Adding a rim to future bowls
Posted: Sun Sep 29, 2013 10:46 pm
by JestersBaubles
Circles are easy (IMO), rings are a bit more of a challenge. I usually cut at least two of a color. If one or both split, I can offset the splits and it usually "heals" when fired.
Dana
Re: Adding a rim to future bowls
Posted: Mon Sep 30, 2013 11:46 am
by Laurie Spray
I love using float to teach students on.......we always have alot on hand to start with then into the trash it goes......then the real fun begins. I would hate to have them learning on Bullseye!
Re: Adding a rim to future bowls
Posted: Tue Oct 01, 2013 2:57 pm
by jjeakle
Are you talking about something like this?