Page 1 of 1
Cracked when using Impression Mold
Posted: Thu Sep 24, 2015 8:48 pm
by Jill Groves
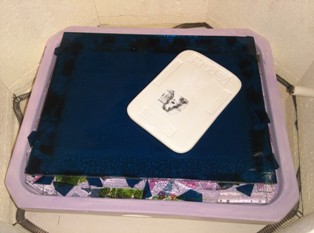
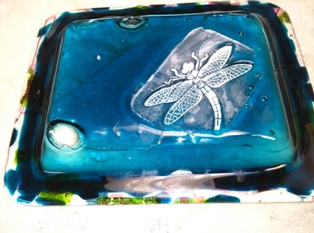
I used new impression tile & rimmed dish mold from Delphi Glass and used provided firing schedule
what went wrong?
- wg1.jpg (25.78 KiB) Viewed 14253 times
- wg2.jpg (33.55 KiB) Viewed 14253 times
- wg3.jpg (16.19 KiB) Viewed 14253 times
Re: Cracked when using Impression Mold
Posted: Fri Sep 25, 2015 8:35 am
by Marty
You'll have to give us the schedule...
Re: Cracked when using Impression Mold
Posted: Fri Sep 25, 2015 8:56 am
by Brad Walker
It'll also help to know how you filled the mold. Is that a bunch of small glass scraps with a piece of glass on top, or something else?
Re: Cracked when using Impression Mold
Posted: Fri Sep 25, 2015 11:59 am
by Vonon
The instructions are:
http://images.delphiglass.com/manuals/220003.pdf
Still trying to discern the difference between layups. It kind of looks like Jill's blue sheet glass overlaps the chips laid in the rim area. Also can't tell if blue glass is a double layer as directed.
Re: Cracked when using Impression Mold
Posted: Fri Sep 25, 2015 6:53 pm
by Marty
I know Delphi says.... but you're going up too fast- that top sheet is trapping air. The instructions show 2 sheets on top, your photo shows one- that'll affect your annealing (which, I suspect, is way short of what it should be).
Delphi has a ton of the usual disclaimers at the bottom of that schedule- this is not a cookbook, although they certainly present the project as a "recipe". You should understand what is happening at each stage and why. Is the volume consistent or will you have to compensate with time and temp both on the way up and at the anneal? Is the mass of the mold factored in to the schedule?
That 5 minute hold at 1000, for example- would someone please explain its purpose?
Re: Cracked when using Impression Mold
Posted: Thu Oct 01, 2015 12:34 pm
by Jill Groves
I followed the instructions and put small pieces of glass in the depression around the sides then i placed two pieces of glass on top the size of the template that they provided.
As you see, i put the impression tile a bit off to the side. I wonder if the tile held the glass on oneside longer than the otherside, causing the opposite side to thin out too much???
Re: Cracked when using Impression Mold
Posted: Thu Oct 01, 2015 12:36 pm
by Jill Groves
Also I used boron nitrate as a separator on the impression tile and i have an incredible amount of white still left in the impression. How do I get this out?
short of sandblasting??
Re: Cracked when using Impression Mold
Posted: Thu Oct 01, 2015 12:38 pm
by Marty
boron nitride
Re: Cracked when using Impression Mold
Posted: Thu Oct 01, 2015 2:26 pm
by Brad Walker
Jill Groves wrote:I used new impression tile & rimmed dish mold from Delphi Glass and used provided firing schedule
what went wrong?
From your photos it's hard to tell exactly what you're asking, but if by "went wrong" you mean that it's off center and doesn't have the even frit look around the edges, then the answer is first that you used scraps of glass instead of frit and you also placed the squares of glass off center. If you're referring to trapped air bubbles (like what looks like a big one at the top), then they're inevitable in this type of project, especially as the glass on top gets larger -- a longer hold at 1250F or prefiring the two pieces together first will help. And finally, if you're referring to what might be a hole at the bottom (hard to tell from the photo), then that's caused by the uneven scraps of glass below. A longer hold at the top temperature would have given the glass time to even out.
As for the boron nitride, the downside to using it as a mold separator is that it's very, very hard to remove if you apply too much or want to switch to kiln wash. The most common way to remove it is to sandblast or to hand sand or grind. In commercial applications it's also done with acids, but that's way too dangerous without the proper safety equipment.