#1 Debbie Bellinghausen
 Miniature
Bud vase/Secret note holder Miniature
Bud vase/Secret note holder
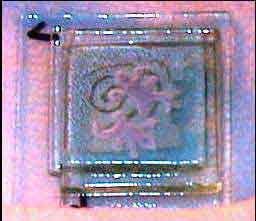
My magless design is modeled after a wall vase I once saw. The pocket
is just big enough for one small flower or a scrolled up secret note.
I used COE 90 glass as follows:
Background (1): Purple irid (1¼W by 1½L)
Pocket (1): Clear (1W by 1½L)
Chips for the background corners (2)/center of pocket (1):
Lt blue opaque
Dichroic accents (7): Dichroic, in different colors, initially
cut into 1/8 strips and
then nipped off into chips with a mosaic cutter
The pocket was created by sandwiching a strip of fiber paper (½W
by 1L) between the purple irid and the clear. The bottom of the fiber
paper strip was tapered into a V. All of the glass was glued in place
with Superglue prior to firing (full fuse) because the pieces would
have shifted on the way to the kiln (and in the kiln) if I hadnt. I
used a dab of Aleenes tacky glue to tack the fiber paper strip to the
irid background and another dab to tack the clear glass on top of the
fiber paper strip. After firing, the fiber paper was removed, the pocket
washed out, and any sharp burrs on the clear glass were filed down (from
where the upper edge of the clear laid across the fiber paper).
Several times during the assembly process, my sanity was brought into
question by members of my family (and myself) for attempting something
this intricate all in one weekend. By the time I was through, I figured
I had handled almost 1,700 individual pieces of glass (12 pieces/magless).
However, I must admit that all the pain and suffering became well worth
it when I opened up the kiln after firing. I hope you agree and enjoy
my offering to the exchange.
Lessons learned:
Dont wait until the weekend before the deadline to do this. (really
hard habit to break, at least for me)
Consider logistics of scale-up when youre designing your piece, especially
if there are several pieces involved.
|
|
#2 Nanette Bowring
 The
eyeglasses hang by one of the arms from the handle of the purse. Put the
magnet on the back of the purse! The
eyeglasses hang by one of the arms from the handle of the purse. Put the
magnet on the back of the purse!
Purse is full fused BE; eyeglasses are Wasser with copper wire for
eyeglass arms and copper mesh for lens, full fused also. I beaded the
arms of the eyeglasses. What I learned is; I love working in miniature.
I love participating in the Magless and being part of the Warm Glass
family, doing the Magless every year encourages me to come up with a
new pair of creative eyewear every year and boy does that copper shed
a lot!! Enjoy!
|
|
#3 Charlie Spitzer

|
|
#4 Flo Vaszquez
 How
To: How
To:
1) Tack fuse 2 sheets of BE 0137 French vanilla together.
2) Cut blasting resist (buttercut) to size sufficient to cover entire
surface of fused blank. Cut sine waves approx. 3/16” wide from
resist so that there will be approx. ½ of a wave per magnet.
3) Blast channels approx. 1/8” deep through one thickness of the
blank.
4) Coat coarse and medium BE 0116 turquoise frit with BE 0100 black
powder. Fill channels with frit.
5) Full fuse blank.
6) Blast back of blank.
7) Using air grinder, polish top surface of blank by progressing through
50, 100, 200, 400 grit disks.
8) Score and break into 1 ¼ x1 ½” pieces.
9) Grind any irregular edges.
10) Using wet belt sander, polish edges and create radial corners.
11) Finish with final quick surface polish by hand using 400 grit diamond
handpad.
What I learned:
It takes an awfully long time to do this much coldworking on 126 small
pieces. While 5 minutes per piece doesn’t sound like much, when
you’re doing that many it adds up! So, if I were to ever consider
producing lots of small items, this finish would probably not be practical.
Doing this much repetitive work isn’t my cup of tea. I don’t
have the attention span, but I’ve gained new respect for those
who do it. I’ve learned I’m a one-off or limited edition kinda
girl!
I’m just proud that I got ‘em in a little early!
|
|
#5 Barbara Cashman

|
|
#6 Rosanna Gusler
 i
carved my design in a block of wood with a dremmel. i then stamped it
in a sand bed. i painted the 1/4" thick float glass blanks on the
air side with ferro sunshine enamel. i used my fingers. placed the painted
blanks on the stamps tin side down. i
carved my design in a block of wood with a dremmel. i then stamped it
in a sand bed. i painted the 1/4" thick float glass blanks on the
air side with ferro sunshine enamel. i used my fingers. placed the painted
blanks on the stamps tin side down.
fired in my big bert kiln to 1530 with a 40 min hold. was firing a 5'7"
tall self portrait at the same time and that schedule was for it. i
then used a sharpie magic marker to mask out the raised portion of the
design. etched with 'vari etch' cream for about an hour. washed off
in a bucket of baking soda water. done
lessons learned?
use a respirator with the vari etch. i burnt my throat and lungs a
little. dark colors look better.
Rosanna
|
|
#7 Robin Ziuchkovski
|
|
# 8 Lynn Golden
 “Quilt
Squares” “Quilt
Squares”
<> Glass used: System 96 <>
Using high fire enamel, stamping medium and rubber stamps, stamp designs
on opal glass. Fire to tack fuse. Cut 2”x2” black squares
for base, 2”x2” clear squares for caps, and 2”x2”
stamped and plain opal squares for design. Cut the opal squares into
1”x1” squares, and 2 sizes of right triangles. Assemble opal
quilt designs on black base, cap with clear. Fire to full fuse. Sign
mags with titanium pen.
This was a great way to practice a new technique, and also to learn
to use the Morton Professional Glass Shop system.
|
|
#9 Celyn Collins
 "How
To" "How
To"
I really like how these turned out. I hope you enjoy them.
I cut a 1" by 1" base of lime green. Hearts were cut out
of copper with a scrapbooking punch. Fiber paper was cut into thin strips.
I put a very tiny drop of glue down then laid the hearts and paper
on the lime green glass. I capped that with a piece of clear glass slightly
larger than my base. High temp wire was cut into strips and I bent them
into swirly hearts. The wire heart was placed in the middle of the clear
cap. A clear piece of glass a quarter of the size of the base was used
to cap the wire heart to give it a "floating" look.
The pieces were fired to a full fuse. The pieces were cleaned of the
kiln wash and strung with beads. They were then signed and bagged.
"Things I Learned"
This all sounds simple but this took a VERY long time.
The heart punch did not like copper and gave out halfway through. Next
time I'll buy two, especially for a project this big. I ended up halfway
punching them out then trimming them up with scissors.
You can not get fiber paper out of a hole that big, so it just became
a part of my design.Do not sit slumped over anything for long periods
of time. There was one day that I couldn't even move.
I bled more from beading than I ever have from cutting glass. This
is why I do not sew.
|
|
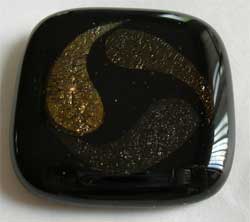
#10 Kevin Midgely
 The
magless is made with 3 layers of Bullseye glass, confetti glass and Tofino
beach sand. The symbolic white starfish was drawn using a Pentel Fine
Point Correction Pen 12ml ZL31-W and a upc code of 6592105142. Not all
whiteout pens are good for this purpose and will yield different results.
Depending on how the application is made you may scrape and shape the
image once dried. The
magless is made with 3 layers of Bullseye glass, confetti glass and Tofino
beach sand. The symbolic white starfish was drawn using a Pentel Fine
Point Correction Pen 12ml ZL31-W and a upc code of 6592105142. Not all
whiteout pens are good for this purpose and will yield different results.
Depending on how the application is made you may scrape and shape the
image once dried. |
|
#11 Travis Raybold
 Making
glass magnets with barbecue grills and martini-shakers Making
glass magnets with barbecue grills and martini-shakers
Every year there is a magnet exchange at the http://warmglass.com
website, where you make 125 or so glass art magnets, and send them in.
Some brave soul volunteers to divvy up al 15,000 magnets so we each
get one of each, and ships them back.
This is my second year participating, and it is an interesting challenge
for me for several reasons:
1) I don't usually work small, so I have to come up with a design that
works for that, and
2)Working in bulk has its own challenges, making 125 of anything in
glass can be a trick!
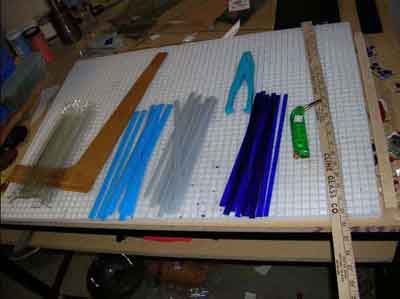
This year I used a variation of the technique I used last year. It
involves making barbecue grills, tile saws, and martini-shakers.
First I sliced off thin strips of clear, opaque and transparent blue
glasses.
Next I propped up a barbecue grill in the kiln on some pieces of kiln
shelf resting on martini shakers. I used a cast iron grill, which spalled
like crazy, but did the trick.
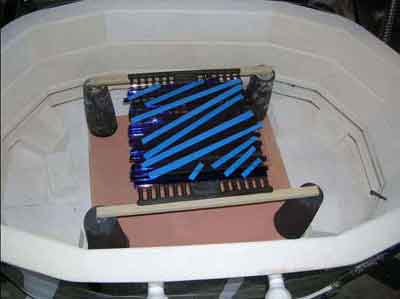
I did this several times, using different mixtures and layouts of glass,
and got sheets of thick glass with interesting swirled colors in it.

Next up was to slice the sheets into squares using a tile saw. By the
time i was done I was coated in a thick, icing like layer of glass-shard
mush. It took me days to get it all out of my hair, next time I'm using
not just a mask and goggles, but a full body suit!

Into the kiln again they go, this time to soften and round up the edges.

And wouldn't you know it, I forgot to take a picture of the finished
product! I'll get a picture of the ones I have leftover up soon, and
a picture of the rest of the magnets that everyone else in the group
made.
Now to start planning for next year's exchange...
|
|
#13 Lib Elder
 I
call it “Fire and Ice”. I love the icy look of clear on clear,
and I like the complimentary color and texture of the smashed copper
pennies that almost convey heat and flame with the random shapes the
pennies are smashed into by the train in my back yard. Add the sense
of movement created by hanging each penny from a wire in the glass “ice”
and I get a sensation of the I
call it “Fire and Ice”. I love the icy look of clear on clear,
and I like the complimentary color and texture of the smashed copper
pennies that almost convey heat and flame with the random shapes the
pennies are smashed into by the train in my back yard. Add the sense
of movement created by hanging each penny from a wire in the glass “ice”
and I get a sensation of the
movement of flame, ice dripping from it if the magnet is on the penny…
or put the magnet on the glass, and as the ice melts you have fire below.
Either way, I like the combination of colors, textures, textiles, the
impressions of temperatures, and the movement.
This is BE clear chunks on a clear base with a wire inclusion, firing
schedule:
400/hr. to 990°, hold :10
400/hr. to 1330°, hold :10
200/hr. to 990°, hold :10
200/hr. to 750°, off
After firing, I added the dangle- a penny that I smashed on the rail
line that runs through my backyard, into which I had drilled a hole
with my drill press. Left up to me, the magnet would go on the penny.
Lib Elder
Eye-‘Doo Art
www.eyedooart.com
Gladys, VA
|
|
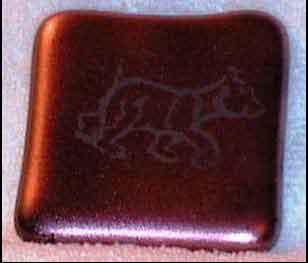
#14 Sadie Cuming
 Sadiesjewels Sadiesjewels
:www.sadiesjewels.com
Each year I do the Magless exchange I try to include a part of my glass
experience for the year. In June I participated in one of Richard La
Londe’s classes on Whidbey Island and so I decided to use his technique
of cmc and glass powder imagery for the basis of my maglesses. The hardest
part of the process is coming up with a design that can be reproduced
150 times (last year I learnt to make many more than I needed to end
up with to account for seconds), but since I’ve been working on
a series of floral based designs a leaf seemed appropriate material
for this years Magless.
1. Make up your cmc mix
2. Mix in your Bullseye frit (powder)
3. Cut out your leaves from one layer of glass
4. Use your cmc/frit mix to paint the lines on the single layer and
let dry
5. Fill in lines with layers of frit (two colors used)
6. Fire to tack fuse
7. Wash and turn over to refire face up as a full fuse
8. Make 160 ladybirds on the torch (this was a real strain)!
9. Clean and ream 160 ladybirds and clean again – grunt work
10. Grind any edges from the leaves that needed cleaning up – wash
thoroughly
11. Arrange ladybirds on leaves and refire to tack fuse
12. Wash, label and bag
13. Race to post office and mail
For the pictoral version please visit my website where I will have step-by-step
pictures posted!
http://www.sadiesjewels.com/magless06.html
|
|
#15 Sandie Walsh
|
|
#17 Mary Farrell
 This
w2005. As I’m sure many of you can relate to, I pulled my first pieces
of glass out of the kiln and there was no turning back!as my first Magless,
indeed, my first year fusing glass, having picked up the hobby over the
summer of This
w2005. As I’m sure many of you can relate to, I pulled my first pieces
of glass out of the kiln and there was no turning back!as my first Magless,
indeed, my first year fusing glass, having picked up the hobby over the
summer of
I’ve been playing around with the Pearl-Ex powders, seeing which
ones retain their colors when fired, go to gold or wash out to silver.
I found that the Spring Green shade stays a very nice green (colored
with a copper oxide??), and since St. Paddy’s day is coming up,
decided to use a Celtic stamp I had for the design.
I used Bullseye black irid for the base, and stamped the design on
using Perfect Medium by Ranger. I applied the Pearl-Ex powder by dumping
a small amount on the stamped square of glass, and then taking a flat
paint brush and gently pressing the powder into the medium. Once the
powder is applied the medium is fairly stable and does not tend to smear,
so you can use the brush to remove the excess powder from the both the
front and the back of the glass. You may
also want to do a quick blast with some canned air before capping.
I then added a cap of clear glass (Uroboros clear), and fired. I’ve
got a little Paragon kiln with a bead door that I bought for initially
for silver clay and as a general purpose jewelry kiln, so heating is
not always very even, and I can only get 9 maglesses in at a time. I
fire that puppy up to 1525 for 30 minutes and let it cool on its own,
and voila!
|
|
#18 Carole Sikula

|
|
#19 Rocky Gentry

|
|
#20 Cheryl Frech

|
|
#21 Kathy Haydon
|
|
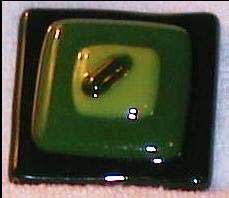
#22 Charles Hall
 Maze
Magless: Maze
Magless:
I started this design because I had some lost wax casting, and wanted
to increase my skill level. I wanted to make a Magless that did something,
and loved mazes as a kid. Most important, I wanted everyone who looked
at this to say "what a great Magless," followed by "
you'd have to be an idiot to make try this."
The basic procedure was:
Master Mold: Positive image made out of basswood
Mother Mold: Negative image of rtv (room temperature vulcanizing) silicon
Wax Mold: Positive image using Victory brown wax
Plaster Mold: Negative image- poured around wax mold
Casting: Positive image for kiln, loaded with glass
Steps in production:
1. Master mold was made of basswood with 2 coats of shellac to keep
the wood from absorbing moisture from the mother mold.
2. Mother mold from rtv silicon. I also tried Moulage and Dermagel without
success. Neither would hold up to multiple wax castings.
3. Wax was Victory brown. I had to agitate the wax with a probe to eliminate
air bubbles
4. Wax molds were cemented to plastic dams with melted wax
5. Dams filled with 50/50 mix of silica and casting plaster. Dried overnight,
removed with compressed air.
6. Wax melted out over steaming water. Plaster dried in kiln (500 to
1150, kiln off)
7. Plaster mold leveled on kiln shelf. Legs of maze were filled with
#03 Bullseye frit, capped with 6mm Uroboros white, then fired.
8. Cast maze cleaned out, washed and sandblasted to remove investment.
Sides and top lightly sanded to clean up.
9. Hematite ball added, topped with oversized clear cap. Fired to tack
fuse ((1140-1150)
10. Clear cap sized to finish on WBS. 60 grit to rough size, 220 to
even sides and first bevel, 600 to finish bevels.
11. Drank bottle of Cline 2002 Old Vine Zinfandel.
I ran into multiple problems as this project proceeded. I have determined
that a small casting like this is very difficult to achieve, because
small defects are magnified through each step, and something can go
wrong at any point. I rejected about 100 wax molds because of trapped
air bubbles, 130 glass castings, and 50 finished magnets in the clear
cap stage, most from glass incompatibility, and others because the clear
clap overslumped, and the ball wouldn't move. I used Uroboros as the
base, and Bulllseye frit for color with no problems. When I added the
caps, I used Uroboros clear, and it developed into a nightmare. I was
getting lots of cracks, and thought it was an annealing problem, but
finally figured out compatibility after some of the castings cracked
a week later. Most cracks were diagonally across the corners. Finished
with Bullseye clear with no further problems.
I learned:
1. Small castings needed a weight, equal to the glass weight to squash
the glass into the mold. I used about the same weight as the glass (35-40
grams)
2. Don't use a B.B. as a ball, The magnet traps the ball in place.
3. Clear cap had to be slumped enough to seal all edges completely without
over slumping and trapping the ball. Unsealed caps filled with water
in sanding stage.
4. Don't mix Uroboros with Bullseye just because you have some laying
around.
5. Before firing the casting, make sure you put frit in.
6. After spending an hour making the casting, make sure you put a ball
in before capping with clear glass.
7. Think twice before trying this at home.
Casting schedule:
250 to 500, hold 10
528 to 1000, no hold
200 to 1650, hold 1 hour
afap to 960, hold 1 hour
kiln off
Clear cap schedule:
250 to 1140, hold 30
afap to 960, hold 1 hour
kiln off
|
|
#24 Lonnie & Merry Creager
 How
to: How
to:
First you use BE Dense White glass for a base. Then add BE black stringers
individually; then fired in kiln.
Then cut into 2”x 2” squares, sanded sides and then laid in
BE yellow, BE red and BE deep cobalt blue individual sections and glued
onto the white square and refired.
|
|
#25 Mary Suptic

|
|
#26 Randy Leachman
|
|
#27 Notorious Women
 Notoriously
Warm Nipples Notoriously
Warm Nipples
What we learned
Several independent test batches yielded results that varied greatly
and included ones that were too big, ones that were too flat, ones that
looked too “cold”, ones that were too gaudy and one attempt
to be overly literal yielded ugly brown ones.
We finally settled on three layers of 1 inch squares with the corners
nipped off for the base( one pink opal, one clear and one clear with
irid) and two layers of ¼ inch squares for the tops. Our favorite
Bullseye machine clear irid makes the center layer of the base and the
tops are Erbium pink transparent and textured salmon dichroic on clear.
We cut them and stacked them production style and it looked like a candy
factory in my studio which made me remember that I had seen a candy
recipe for nipples and that sent me on a search that yielded several
recipes for Nipples of Venus- a truffle style candy and our favorite
nipple recipe, the one we included with each Maggie, Red Hot Venutians-
a chocolate truffle made with cayenne pepper. It was the recipe that
seemed most worthy of warm glass and notorious women. We also discovered
an Italian pastry, sort of like an éclair called Minni’s
(Breasts) D’ St. Agnes- it’s interesting because St. Agnes
is the Patron Saint of breast cancer patients. We intentionally fired
our maggies to differing stages of tack vs. full fuse and found the
variety in texture pleasing and a fitting representation of the vast
diversity belonging to this feminine icon. Some worried that we were
going too far by exposing these nipples but isn’t showing someone
your breasts a sign of encouragement? We believe them to be symbols
of motherly nurturing and abundance! Notorious Women are fond of that
saying- “Well-behaved women rarely make history.” Several
members of our group, which is an artists’ support/collective,
have family and friends who are victims and survivors of breast cancer.
We learned that 182,000 women are diagnosed each year with breast cancer
and that early detection saves lives. Sometimes all we need is a friendly
reminder... So St. Agnes became for us St. Maggie and we are sending
out 126 warm pink wishes for good health and good fortune, encouragement,
abundance, and warm glass.
 www.notoriouswomen.com www.notoriouswomen.com
Nipples D’ St. Maggie were created by Jenn Frangi, Kelly Thames
and Lynn Gay.
|
|
#28 Dave Nutty

|
|
#29 Estelle Dean

|
|
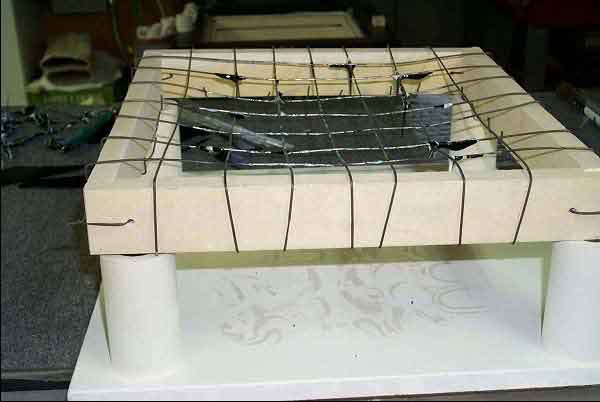
#30 Ron Coleman
  I
use 304 stainless steel expanded metal for my melts. I got it from McMaster
Carr. The openings are diamond shaped, about 1 x 2-1/2 inches. I don't
remember the stock number, but mine was about 1/16 inch thick. I have
used stainless steel welding rods too, like in this photo. The rods
were 1/16 diameter 316 stainless steel. I
use 304 stainless steel expanded metal for my melts. I got it from McMaster
Carr. The openings are diamond shaped, about 1 x 2-1/2 inches. I don't
remember the stock number, but mine was about 1/16 inch thick. I have
used stainless steel welding rods too, like in this photo. The rods
were 1/16 diameter 316 stainless steel.
I usually stack the glass in about 4 layers and mix up the colors with
clear. When all stacked up you can't see the shelf looking directly
down on the stack, it's all color in various layers.
|
|
#31 Tom White
 Since
these magless are made from recycled skyscraper windows the first step
in their creation was locating the skyscraper windows which had been
removed by the local glass shop and obtaining permission to recycle
them. These windows were double pane ¼” glass 41” x
77” and weighed over 300 lbs. Both the dark, coated glass and the
clear, uncoated glass had to be cut off the center aluminum spacer and
cut to 21”wide by 41” long for transportation and storage.
The 2” square magless were cut from the coated glass left from
cutting 10” and 7” square blanks for plates. The 2” squares
were cleaned placed coated side down on a scrap of cardboard and the Since
these magless are made from recycled skyscraper windows the first step
in their creation was locating the skyscraper windows which had been
removed by the local glass shop and obtaining permission to recycle
them. These windows were double pane ¼” glass 41” x
77” and weighed over 300 lbs. Both the dark, coated glass and the
clear, uncoated glass had to be cut off the center aluminum spacer and
cut to 21”wide by 41” long for transportation and storage.
The 2” square magless were cut from the coated glass left from
cutting 10” and 7” square blanks for plates. The 2” squares
were cleaned placed coated side down on a scrap of cardboard and the
top and all four sides were airbrushed with Super Spray. After the Super
Spray dried the squares were placed on the texture bed liberally dusted
with Unique Glass Colors “Free” powder on the kiln shelf and
fired to 1420 F with a 30 minute hold. The kiln was cooled AFAP without
opening the lid to 1020 F, held for 30 minutes then dropped 75 F per
hour to 700 F then allowed to cool naturally to room temp the next day
before opening . The magless were removed, rinsed to remove any clinging
“Free” powder, labels applied, bagged in labeled bags and
packed in a USPS flat rate priority box. Peanut brittle and the recipe
for it filled the top of the box to prevent shifting and banging in
transit
Photos will be posted at http://photos.yahoo.com/tomwhite2
in magless 2006 album when time allows.
What I learned
1. This coating is very temperature sensitive. Just a few degrees too
hot destroys the iridescent effect.
2. Anti devit spray is needed to keep this glass shiny.
Best wishes,
Tom in Texas
|
|
#33 Nancy Lappenbusch
 How
to: How
to:
1. Find a clean joke.
2. On the computer design a 2x2 mag with joke and accompanying graphic
of unique rabbits.
3. Repeat the 2x2 design as often as possible on a single sheet.
4. Copy this sheet onto Micro Mark decal paper, product number 82371.
The micro mark website is www.micromark.com. This process will only
work if you use a HP laser copy cartridge. (refer to Xerography tutorial
on
http://www2.cemr.wvu.edu/~venable/rmi/studio/xer4jac.pdf)
5. Cut up the designs and soak them in a tub of water, changing the
water frequently. They slip right onto your 2x2 square. I used Bullseye
opals. Let the decals dry overnight to minimize bubbles.
6. Here is the schedule I used to create the permanent image on the
glass:
500 degrees per hr to 1100
300 1240
AFAP 960 hold 15 mins
150 750
AFAP 80
7. Clear capped with tekta 3mm and fired:
500 degrees per hr to 1100
300 1240
AFAP 1430 hold 5 mins
AFAP 960 hold 15 mins
150 750
AFAP 80
8. Soaked in vinegar to remove kiln wash.
9. Forget to send in “How to” and “What I learned.”
What I learned:
Find a joke you can live without because by number 126 you will hate
every word of it.
Clear capping the decals seemed to trap bubbles no matter what I did.
The decals also morph and flow so the original design distorted. Not
such a bad thing unless the image includes words in small type. I would
recommend putting decals on the top layer even though you lose the lens
effect of clear capping. Maybe someone has discovered a way to stop
the decal from flowing when sandwiched. I would love to hear how. Super
spray?
Test a small piece of glass in the kiln rather than slicing up a huge
sheet into 80 small squares that you will soon discover you cannot use.
I purchased a lovely sheet of salmon glass only to learn that the brownish
iron deposit left from the decal didn’t pop enough when it was
complete. Now I have lots of little salmon squares. I would have preferred
a left-over sheet of salmon. I switched to mint green and turquoise
blue. Better.
|
|
#34 Starr Lee
 I was experimenting with colors and mosaics and texture. Some are prettier
than
I was experimenting with colors and mosaics and texture. Some are prettier
than
others but as a group of maglesses they were purty. Wish I had taken
a picture.
I cooked them about 25 at a time in an Olympic kiln 146GFE/120v on
a 13" round kiln shelf. I was going for texture so my fire schedule
was as follows.
400 1250 10
9999 1410 35
9999 960 15
150 700
|
|
#35 Randy Peterson
|
|
#36 Lynne Chappell
 Technique: Technique:
Bullseye glass with inclusions of cedar, electroformed with copper.
What I learned:
I was new to electroforming, and learned a lot through this exchange.
Since the technique was new, and I left it too late, there were many
failures, but I had to include a lot where the electroforming didn't
quite work. It involves coating the branches with a conductive paint,
immersing it in a special solution and running a very low voltage DC
current from the copper anode to the negative object. The first few
turned out very well, but because the copper leaves were quite thick
there were problems - bubbles, and the clear cap sliding off! Solved
that by putting fine clear frit under the cap. Then a lot of them ended
up with the copper burning out, and leaving a silver residue, which
looked OK on some, but just yellow/grey on others. So I thought I was
just in too much of a hurry to get a good coating on them, so I left
one batch cooking all night. It was even worse. I then discovered that
the solution had deteriorated, and by putting in fresh solution I got
a nice shiny copper coat in about two hours, and most of those ones
looked the way they should.
|
|
#37 Terrie Voight
 “Pollack
Revisted” “Pollack
Revisted”
Layer in order: sheet of thin green (gr) glass; gr mica flakes; sheet
of standard clear glass; shards: transparent (tr) teal, opalescent (op)
green; variety of frits:
fine op jade gr, coarse op jade gr, med tr lt amber, aventurine gr;
stringers: aventurine gr, coarse rectangles. Fire slowly to 1250 degrees.
Fire quickly. Cut sheet into approxiamately 1 1/3” pieces. Center
standard black base. Fire to 1475. Anneal.
|
|
#38 Laura Schuler

|
|
#39 Linda Matteson
|
|
