| |
#40 Paul Tarlow
|
| |
|
| |
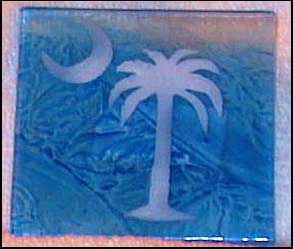
#41 Anitra Watley Allen
 Now
that all my glass emissaries have been labeled, bagged, boxed and shipped
all the things that I would have, could have and should have done to
make them better come to mind. They will be strewn all over the country,
well the world for that matter, conjure them perfect I would; but the
deadline for their transport had arrived, and I have no more time to
give them. So I send my ambassadors off into this world Now
that all my glass emissaries have been labeled, bagged, boxed and shipped
all the things that I would have, could have and should have done to
make them better come to mind. They will be strewn all over the country,
well the world for that matter, conjure them perfect I would; but the
deadline for their transport had arrived, and I have no more time to
give them. So I send my ambassadors off into this world
with as much finishing as I could give them at this instant. I pray
that they’ll make me the proud if I ever meet them again. There
is much I would have done differently to save time and some things wouldn’t
have done it all. A superior learning curve was obtained during this
endeavor. For instance:
• There is a vast gradient of temperatures in my kiln from top
to bottom
• Skills to reduce and combat devitrification were acquired
• Discovery of the fact that I must be crazy was encountered more
than once
• Small matter how careful one is in cutting glass one will still
bleed on it
• Inclusions find air bubbles irresistible
• Not all copper wire is created equally
• Glass is a lot like hard candy
• In the same way that first cousins really should not marry, clay
artists should stay away from glass photo
• There’s always a piece of expensive equipment one could
use to do the job easier if not better and faster
• The more you learn the more there is to learn
• CMC leaves a residue
• One can not over clean glass
• Prototypes are easier than production
So therefore my time was not wasted.
 Introduction: Introduction:
Glass log: Jan. 6, 2006 I've taken on a rather large and unprofitable
glass project. I am exchanging “mag-glass/Magless” (refrigerator
magnets without magnets, made of glass) with 125 other glass artists
from around country (and a few from the world at-large). The deadline
is February 14 (actually to 17th, but it needs to be delivered by then);
that seems so far
away in November when I signed up; but now it's just next month. Yesterday
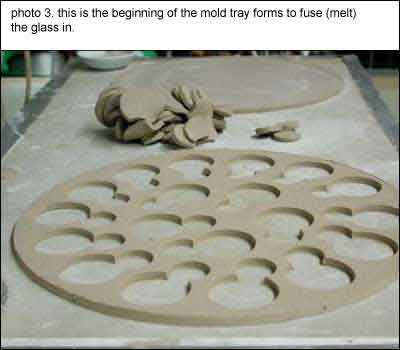
the second stage of this project was completed; and that was making
the clay molds in
which to form the “mag-glass”.
It takes 2 or 3 days to dry before the trays is ready for the bisque
firing. Bisque firing at 1800° Fahrenheit, cone 06, is run after
the clay is completely dry. The clay mold trays take 2 or 3 days to
totally dry ready for bisque firing at 1800° Fahrenheit, (cone 06).
Surprisingly enough, I am not in full panic mode yet but I am starting
to be concerned about the
time left.
 Glass
log: Jan.07, 2006 Glass
log: Jan.07, 2006
“What is the point of this magnet business?” a fellow clay
artist asked me. Well I should obtain 125 glass pieces in this exchange.
Well as lease in presumption. It seems at lease five people never get
it done. I should recieve some one hundred plus maglesses. Let me send
you to last year’s exchange,
http://www.warmglass.org/magnet/2005_Section_One.htm. You will notice
some of these are made with pride and great expertise while others are
done on a wish and a prayer. Various ones have well equipped glass shops
while others who get by with the bare necessities. The last few years
have yielded a charming assortment of glass pieces. I desire to have
a collection of glass boggles like this. This could be a grand teaching
tool. “Ahhhhhh,”says my friend, knowingly. “There is
no money in it” Why then am I doing this, one might as? Well…
to tell the truth, I’m not sure. I am not certain why I am playing
with glass to begin with; after all, I am a clay artist. I will have
this to show for the winter of 2006, maybe? Yes, I’m having fun
with it but it is costing me time and resources without justification;
it is sort of like a vacation. I’d been keeping the time I’m
wasting here a secret from my spouse. Yes it is a wayward little magless
secret. The four trays I made for my glass are drying now and I will
bisque today or Monday. 4 trays of 16 cavities each means I’ll
have 64 pieces in the first full fuse firing. I could not help myself
on the last two trays I carved grooves into the bulb bottoms; I’m
sorry now for all other the magless won’t be exactly the same.
I’d plan on making extras in case of breakage and seconds. It is
very hard for me to produce the same design without change. I have the
same problem making cookies.
  Glass
log: January 10, 2006. Glass
log: January 10, 2006.
The bisque firing for tray molds ran yesterday; the iln is cooling;
it is around 500° now. This afternoon, the kiln can be unloaded
and six or seven layers of kiln primer will need to be painted on to
these forms. There's plenty to do during the wait because now 150 of
those wire dolls need to be made. Certainly they won't all be made before
the kiln cools. The wrapping of these dolls has become much quicker
now that a couple of dozen have been made. The prototype took a nice
bit of time, but once the sequence of wrapping was figured out they
can be done mindlessly while watching television. I however will sit
on the patio and enjoy watching the quail, the bunnies and the neighbor’s
horses once the sun burns the chill off this morning’s air. The
wire used for the dolls was obtained from an electronic salvage supplier.
It is copper wire even though it appears silvery, most likely it has
a tinned coat, probably lead. After embedding in glass, it turns a reddish
copper color. After wrapping these little figures, I flattened them
on an anvil with a hammer; the flattened wire doll embeds easier between
glass layers. I get quite a little rhythm section going as I flattened
my wire dolls, which scares most of the critters away, all but the flies
that is.
 Glass
log: 1/17/06 Glass
log: 1/17/06
After a week of preparation and cutting glass the first batch of glass
for my magnet/magglass were fired to cone 014. They are truly awful;
they look more like tubes than bulbs, very misshapen. They have many
unsightly bumps and bulges and points; in short they are deformed. I
also noticed some devitrification. Oh well, I'll rework them; I can't
have them looking that crude. I must have taken the kiln up too slowly.

Perhaps I should mention that I’m using Bullseye glass CEO 90.
The kiln is a small Paragon, ceramic kiln; it has nearly one cubic foot
capacity. It's a manual kiln, just a sitter and a timer; there's neither
computer interface, nor fire mate. I turn the kiln from low to medium
to high at single hour intervals. It has no elements on either the floor
or the lid, only in the walls. The trays are stacked with 1 inch between
levels. After firing the color of the copper wire varies from white
to copper to black; whatever was used to tin coat that wire is giving
some odd results, there is a remote possibility that it is a metal other
than copper. Glass log: 1/18/06 First thing this morning after grooming
was for me to go out to the studio and flip the switch on the kiln.
That's right, lot 2 is firing as I write this. It will probably take
four hours to come to temperature; that's about 1500° Fahrenheit.
I'll let it soak this photo 8. Very disappointing this first batch,
I'll washed and fire them on their reverse side. photo 6 before (left)
and after.
 After
firing the color of the copper wire varies from white to copper to black;
whatever was used to tin coat that wire is giving some odd results,
there is a remote possibility that it is a metal other than copper. After
firing the color of the copper wire varies from white to copper to black;
whatever was used to tin coat that wire is giving some odd results,
there is a remote possibility that it is a metal other than copper.
Glass log: 1/18/06
First thing this morning after grooming was for me to go out to the
studio and flip the switch on the kiln. That's right, lot 2 is firing
as I write this. It will probably take four hours to come to temperature;
that's about 1500° Fahrenheit. I'll let it soak this time at temperature
for about 10 minutes before a crash cooling it to 1000°F. I've read,
in theory, if I let it sit at temperature it should level out nicely.
Glass must be cooled, very slowly from 1000° back to room temperature;
the hardest thing for me to do is wait the 24 hours it takes to cool.
I learned this the hard way. Once I opened a kiln early; that mistake
caused cracks. Now I trust a Pyrometer.
Results of firing:
The copper wire from my old battery cable has a blue/green halo around
it, possibly from battery acid. Few figures were made from this wire,
but it's an interesting side effect that I may try more of. The figures
that I dipped in the ceramic pigment have an attractive patina. The
iridescent glass highlights embedded between layers is hardly noticeable
unless you're looking for it.
 Glass
log: January 22, 2006 Glass
log: January 22, 2006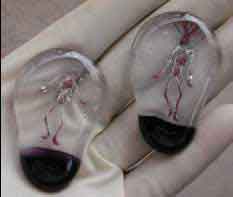
Unloading today’s kiln, which was fired at cone 015 I’ve found
borax solution also works well on the devitrification, but one must
be very careful in its application. If any of the solution drips onto
the reverse side of the glass there is a problem with kiln wash sticking
to one’s work, ensuing in the need to rock tumble it. It is best
to spray on the borax solution, but of course that takes another piece
of equipment; that is a sprayer plus the compressor to run it. Also
I’ve read sandblasting the surface and firing will solve all devitrification
problems providing of course, that one has a sand blaster. The floor
of the kiln is much colder than the rest the kiln. Therefore, the bottom
inch or so of the kiln is not suited for full fuse. The top of the kiln
near the lid is also too cool for a full fuse.

Glass log: 2/07/06
Busy, busy, busy and yet, so far from being done. Here I am coming close
to that February 14 deadline and I'm only one third of the way there.
My magless secret is out of the bag as the hubby took vacation days
this week; he notice my attentions were elsewhere. “Honey”
I said, “I’ve got a deadline.” He is disenchanted now,
but just wait until I dazzled him with the most intriguing refrigerator
magnets collection in all of Arizona!
The glass pieces were developing a cloudy haze from being fired multiple
times. The scummy haze is called devitrification; I understand it is
a growth of microscopic crystals on the surface of the glass; it's the
mark of a true amateur, which I just happen to be. To counteract the
spots of scummy surface I've purchased a rock tumbler and tumble the
glass pieces, overnight. After tumbling, the result is an evenly frosted
surface.
 Luckily
the rock tumbler was on sale, only 20 bucks! An artist friend loaned
me her tumbler, which hadn't been used for 20 years; but it had all
the carbide grits with it. The loan tumbler was a much better make than
the Chinese one that I bought. Between the two tumblers I was able to
get 50 of them ground off and fire polished. They're bit of all right!
My Chinese rock tumbler has busted to drive belts, and is now out of
commission while the 20- year-old American-made one is still going strong. Luckily
the rock tumbler was on sale, only 20 bucks! An artist friend loaned
me her tumbler, which hadn't been used for 20 years; but it had all
the carbide grits with it. The loan tumbler was a much better make than
the Chinese one that I bought. Between the two tumblers I was able to
get 50 of them ground off and fire polished. They're bit of all right!
My Chinese rock tumbler has busted to drive belts, and is now out of
commission while the 20- year-old American-made one is still going strong.

Conclusions:
On the whole this was a most expensive, laborious, time-consuming project;
Speaking of time, it took the entire day just to put them into little
plastic bags with labels on them. It is factual “that every good
idea is 1% inspiration 99% perspiration”. It helps to know that
there are at least 125
other people in this as foolish as I am.
If I were to do it again, I’d probably use float glass and metal
oxides rather than that costly Bullseye art glass. I’d also want
a partner, preferably one with greater expertise; and a better-equipped
studio plus a shoulder to cry on. However, I feel now that I shall not
do this again.

A helpful discovery I shall pass on is that latex exam gloves can reduce
the amount of glass sliver cuts on one’s hands as well as keeping
one’s hands warm in a chilly studio.The last pieces out lost the
angst those first worked and reworked ones had. As a process became
a little more streamlined the work became more relaxed and refined.
Cone 014 seem to be the best firing temperature for full fuse in the
belly of my ceramic kiln; that is 1525 degrees F or 830 C. This temperature
allows me to fire polish on the floor of the kiln
and to hard tack fire at the top of the kiln. It does little to crash
vent the kiln to stop devitrification. It may even be hard on the kiln
and the furniture. When using cones soaking after the cone bends does
minuscule to shape. The soft diffused surface of the rock tumbled glass
was preferred but I had to stay the course of harder fire polished look.
Thanks be to God, that I was healthy enough, wealthy enough and spiritually
inclined to finish this project. Now that it’s all over I can shout
out loud, Glory, Glory Hallelujah!
|
| |
|
| |
#42 Kent Allen
 What
I learned: What
I learned:
Perfecting the Magless will take more time than originally estimated.
Punching out over 252 butterflies is a tedious task.
I originally started the project trying to fuse a penny between a layer
solid background color and a clear layer. I quickly learned that not
all pennies are created equal. Here's a Penny's History
• The composition was pure copper from 1793 to 1837
• From 1857, the cent was 88 percent copper and 12 percent nickel,
giving the coin a whitish appearance.
• The cent was again bronze (95 percent copper, and five percent
tin and zinc) from 1864 to 1962.
(Note: In 1943, the coin's composition was changed to zinc-coated steel.
This change was only for the year 1943 and was due to the critical use
of copper for the war effort. However, a limited number of copper pennies
were minted that year.
• In 1962, the cent's tin content, which was quite small, was removed.
That made the metal composition of the cent 95 percent copper and 5
percent zinc.
• The alloy remained 95 percent copper and 5 percent zinc until
1982, when the composition was changed to 97.5 percent zinc and 2.5
percent copper (copper-plated zinc). Cents of both compositions appeared
in that year.
I found that new pennies melt into what is best described as small
zinc BB’s. I then tried 1962 to 1981 vintage, the pennies didn’t
melt, but got a lot of bubbles. I tried, 2 months every weekend 2 firings
every Saturday and Sunday, to eliminate the bubbles with different soak,
ramp times, temperatures, glass etc. No matter how slow the ramp down
and soak temperatures of the penny fusing schedule, all of the pennies
would crack the base layer. I could never eliminate the
bubbles completely.
Time and patience running thin, I switched over to pure copper butterflies,
no bubbles. For this set of Magless, I used Spectrum System 96 Hi-Fire
Iridescent Black #I/1009SF as the background and Spectrum System 96
Clear Smooth Cathedral #100SFS as the clear cap.
Fusing Schedule:
| Rate (°F/Minute) |
Temp (°F) |
Hold Time |
| 300 |
250 |
25 min |
| 300 |
750 |
25 min |
| 60 |
1220 |
30 min |
| 60 |
1300 |
15 min |
| 600 |
1480 |
15 min |
| AFAP |
1000 |
10 min |
| 90 |
970 |
2 hrs |
| 1200 |
750 |
1 min |
|
| |
|
| |
#44 Barbara Elmore
 Ok,
from the beginning, I took a class with Brad Walker a few months ago,
and one of the things I brought for an experiment was some brass steel
woolish stuff. Made by Mr. Clean, If you are careful, you can punch
out one end, and un-crochet it. If you roll it out, it looks like chain-maille
(not sure if that is the word, think of jousting in Medieval times and
the stuff that covered their arms). Ok,
from the beginning, I took a class with Brad Walker a few months ago,
and one of the things I brought for an experiment was some brass steel
woolish stuff. Made by Mr. Clean, If you are careful, you can punch
out one end, and un-crochet it. If you roll it out, it looks like chain-maille
(not sure if that is the word, think of jousting in Medieval times and
the stuff that covered their arms).
Wrapped the brass around a Bullseye clear iridized glass in a cross
hatch pattern, with plain Bullseye glass on the top and the bottom.
Did this in a pattern bar size, 6 x 10 or so, and ramped up very slowly,
did a bubble squeeze and held at 1450 for 30 minutes.
Everything looked OK.
Then I cranked up the Taurus #3 and the blade went flying. No words
of wisdom from Gemini. So, we took off and went to Harbor Freight (about
80 miles away) and bought a wet tile saw, that was luckilly on sale,
for $59.00 or so.
Sliced up the pattern bars into a 1 x 1 1/2 rectangles, hand polished
the edges with three different diamond pads, put a Borax overspray on
them and pretty much
followed the same temps and time, but at a lower top temperature, 1350,
so I wouldn't round out the sides, and keep it rather crisp, with less
of a hold.
Wrong.
The wrapped middle layer of iridized clear glass, covered with the
copper wire, albeight very, very, small gauge, wouldn't let the whole
thing completely fuse. The edges were, well, yucky. 40% went into the
trash, 60% are included, but with
apologies
What I have learned? 3 layers of glass is too much without thinking
ahead to how the glass will behave (or absolutely NOT behave) when it
isn't damed.. Looks like a tire with bubbles, everywhere they could
form.
Places (like big, big zits) in the top of the cab popped off and landed
on the other side of the kiln. Cabs moved, and moved a LOT, to meet
with other cabs even tho I had spaced them well and they were not wet,
nor was anything else in the kiln.
Did the best that I could, and tried to figure out what to do next.
Today is Tuesday, the rest are drying, and I'll be lucky if they make
it to Texas by Friday.
This second phase has been made individually, as was the prototype.
The sandwich is made up of graduated pieces of glass. The bottom layer
is approximately 2 and 3/4 inches. The middle is made up of a slightly
smaller piece, of maybe 2 1/2 inches of iridized glass wrapped in copper,
and the top is the largest piece ( 2 13/16" or a bit more) so that
it can cover and drape down over (hopefully) the rough edges of the
copper in the middle.
Final schedule: for a square 3 layers thick ,and 2 and 13/16 or a bit
more at its widest.
1. 300 dph to 1000, hold 10 minutes
2. 200 dph to 1250, hold 15 minutes
3. 400 dph to 1475, hold 30 minutes
4. 500 dph to 960, hold 35 minutes
5. 250 dph to 700, hold 10 minutes.
6. Off, and let cool to room temperature overnight.
I have tweaked and tweaked this schedule and still don't understand
where the things are blowing up and moving all over the kiln!
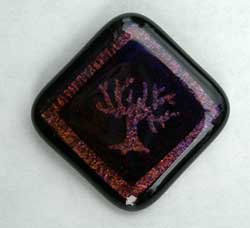
I really wanted more of the blue color from the copper, but mostly
got red and purple. In some cases, where I was doing the pattern bar
thing, the colors were all over the place, blues on the outside (that
kind of "leaked" into the clear glass),
then the purples and reds and golds as you got to the center. Maybe
I didn't hold long enough on the way up?
The colors of the copper have been mystifying......................Some
stayed a copperish purple, some a copperish gold, and some turned a
beautiful blue/green.
Funny thing, tho, all these colors were sometimes in the same pattern
bar, with holds to even the temp, and holds to minimize the bubbles.
Go figure. The one I did in Brad Walker's class was great. The top layer
was cut larger so that it could come down and cover the sides to hide
the mesh, colors were great, no problem.
I guess it's one of those things that needs to be done individually,
and I will finish this up tomorrow or when I can open the kiln.
|
| |
|
| |
#45 Cecilia Davis-Taylor
|
| |
|
| |
#46 Robert Krug

|
| |
|
| |
#48 Tim Smith
|
| |
|
| |
#49 Kelly Alge
|
| |
|
| |
#50 Linda Hattershide
|
| |
|
| |
#51 Tony Smith
|
| |
|
| |
#52 David Wingo
|
| |
|
| |
#53 Darlene Palmer
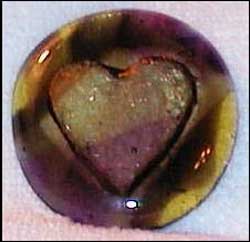
 How-to
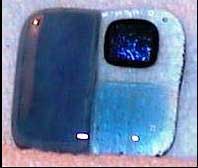
for "Dichroic Flats" How-to
for "Dichroic Flats"
Rectangular BE black base, a slightly smaller piece of Wasser metallic
antique copper, and a small piece of dichroic balloon glass. All pieces
glued together. A drop of turquoise Glassline paint is added to each
corner. Then after allowing the glue to dry overnight, each piece is
turned upside down on the kiln shelf and fused at 500 degrees to 960,
then fast as possible to 1450. No hold. Open door to fast cool to 1050,
then left overnight.
What I Learned....
The idea was to make the dichroic side of the magless as flat as possible
and have the Glassline paint dots in the corners end up on the sides.
In order to have each piece of glass be centered, they needed to be
glued and left to dry overnight. The first couple of test pieces didn’t
have enough glue and fell apart when turned over. Learning my lesson,
I added more glue and left overnight again. This time they remained
together and fired correctly.
|
| |
|
| |
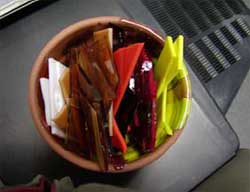
#54 Marsha Toms
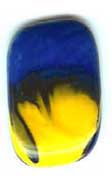
 My
maglesses are miniature pot melts done in very tiny clay pots. The glass
I used was about ¾ clear mixed with yellow, adventurine green,
and cobalt (I think) blue. I enlarged the holes on the pots and stacked
the glass inside horizontally. Fired to 1700 degrees for 30 minutes.
I was able to fire about 10 at a time and I was able to keep reusing
the pots. I hope you enjoy My
maglesses are miniature pot melts done in very tiny clay pots. The glass
I used was about ¾ clear mixed with yellow, adventurine green,
and cobalt (I think) blue. I enlarged the holes on the pots and stacked
the glass inside horizontally. Fired to 1700 degrees for 30 minutes.
I was able to fire about 10 at a time and I was able to keep reusing
the pots. I hope you enjoy
|
| |
|
| |
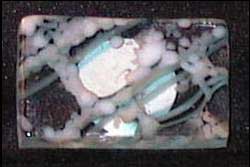
#55 Michelle Gotthold
 My
magless is a 1.5" square of bullseye opal (many are curious colors)
topped by a 1" square of white. The white square was sprinkled
with Thompson enamels then covered with clear frit. All was brought
to a full fuse. What really surprised me was how much difference there
was in how the different colored bases "beaded up" -- I know
different colors absorb heat differently, but I was surprised by just
how much! The steel blue pieces fused so much they were almost more
round than square while the red and powder blue pieces were closer to
tack fused than full. (I re-fused the tack fused pieces so they would
flatten out more.) I also learned that I can only do one full fuse with
opals on a shelf before changing the kiln wash -- one whole batch came
out with needling and rough edges when I tried to get a second firing
on one shelf. My
magless is a 1.5" square of bullseye opal (many are curious colors)
topped by a 1" square of white. The white square was sprinkled
with Thompson enamels then covered with clear frit. All was brought
to a full fuse. What really surprised me was how much difference there
was in how the different colored bases "beaded up" -- I know
different colors absorb heat differently, but I was surprised by just
how much! The steel blue pieces fused so much they were almost more
round than square while the red and powder blue pieces were closer to
tack fused than full. (I re-fused the tack fused pieces so they would
flatten out more.) I also learned that I can only do one full fuse with
opals on a shelf before changing the kiln wash -- one whole batch came
out with needling and rough edges when I tried to get a second firing
on one shelf.
|
| |
|
| |
#56 Linda Hassur
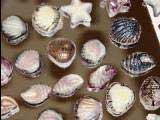
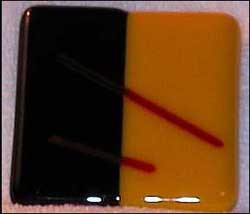
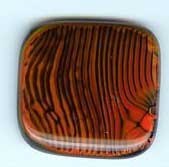
 I
started trying to cut out strips that were straight enough to fuse together.
I soon realized this was going to be a big job. I had a "Silberschnitt
Roll up pad with parallel cutter" that I hadn't used but a couple
times. I got it out and that was the answer. You can cut straight thin
strips that are very accurate. I cut out strips of all colors of opaque
90COE BE glass. I used BE opaque white for the I
started trying to cut out strips that were straight enough to fuse together.
I soon realized this was going to be a big job. I had a "Silberschnitt
Roll up pad with parallel cutter" that I hadn't used but a couple
times. I got it out and that was the answer. You can cut straight thin
strips that are very accurate. I cut out strips of all colors of opaque
90COE BE glass. I used BE opaque white for the
bottom piece and placed the colored strips on top of it. My kiln will
only hold a 10X12 inch piece of glass so that was the size I fired.
Unfortunately, my kiln started "spitting" small pieces of
kiln brick from the top elements. So it ended up taking a lot more time
since I had to drill these pieces out and refire. I also had problems
with devit on some of the colors so used overglaze for that problem.
I cut the large piece of glass into strips about the length of each
heart. I used a pattern that I traced onto these strips. I used a Pilot
thinline pen for this purpose. I roughed out the shapes using a glass
cutter and breaking pliers. I then applied Chapstick on the pen lines
so I could keep the pattern visible during the grinding process. On
pieces that were too much to grind, I used a glass saw to get
the shape more accurate. I then did a lot of grinding. I used a small
grinding head to shape out the tops of the hearts. They were then fired
again and sometimes again and again because of devit. I just kept using
either Spray A or clear overglaze on the hearts and fired again.
I was pleased with the way they turned out. To me they resemble striped
hard candy.
|
| |
|
| |
#57 Katy Wills
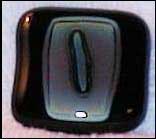
 Little
Keyboards Little
Keyboards
Cut base pieces and add stringer to be the spaces between fuse (1380).
Add the keys and fuse again (1330).
Next time, I would fuse the bases upside down so that the doesn't move.
I lost a few pieces firing the way I did.
|
| |
|
| |
#58 Patti Rohwer-Nutter
 Mine
were pretty simple - I was initially inspired by African Kiffa beads.
In Northwest Africa, women grind bottles to make powder, make a paste
with gum arabic and/or spit, and then make beads decorated with intricate
patterns of powdered glass. The beads are then fused on sand in a can
on top of a charcoal fire. (See http://www.lapidaryjournal.com/feature/june00str.cfm). Mine
were pretty simple - I was initially inspired by African Kiffa beads.
In Northwest Africa, women grind bottles to make powder, make a paste
with gum arabic and/or spit, and then make beads decorated with intricate
patterns of powdered glass. The beads are then fused on sand in a can
on top of a charcoal fire. (See http://www.lapidaryjournal.com/feature/june00str.cfm).
I used Bullseye powder mixed with distilled water and different amounts
of gum arabic, Klyr-Fire and/or clear mucilage (just what I happed to
have on hand). All three binders worked equally well, but black powder
mixed with mucilage makes a
thick goo that feels like a mixture of silly putty and snot!
Shaped "biscuits" out of a stiff powder mix, let dry for
an hour or so. Drizzed or dotted different slurries of powder, dried
under a hot lamp for 8-12 hours, then fused (either 1400 x 10' or 1420
x 20'). Vented the kiln on the way up until it reached 1000-1100 degrees
to burn off all glue residue.
At first I tried to make patterns reminiscent of those found on kiffa
beads, but it was very laborious getting the suspended powder evenly
suspended and keeping consistent lines and dots. I started randomly
drizzling the powder slurry and aiming for a marbled look. I'm planning
on making my own CMC "liquid stringer" mix the next time I
try this, which will hopefully give me better control.
|
| |
|
| |
#59 Denise Dennstedt
 I
decided to combine two techniques with my mags. Copper inclusions &
powdered frit stenciling. My magless’s consists of 2 layers of
Bullseye 90 COE glass. The base glass is white & the top glass is
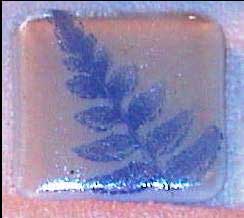
clear. I was going for a look of depth with the moose behind the tree. I
decided to combine two techniques with my mags. Copper inclusions &
powdered frit stenciling. My magless’s consists of 2 layers of
Bullseye 90 COE glass. The base glass is white & the top glass is
clear. I was going for a look of depth with the moose behind the tree.
I tried two different coppers, one being a semi- thin sheet cooper
the other is an adhesive backed copper foil in sheet form. I used a
paper punch to cut out the moose shapes. I found that the preferred
the adhesive backed foil for three
reasons 1) it was thinner so, easier to punch, 2) it stuck to the glass
& stayed in place and 3, because it didn’t require a bubble
squeeze firing as did the other copper sheet.
I tried several different green frits before I settled on Adventurine
green. Each tree has two layers of powder.
The lay-up:
white/moose/clear/stenciled tree
firing schedule:
500/1400 -hold 10/full/960- hold 15/off (fire schedule for adhesive
backed foil)
500/1100-hold 20/150/1250 hold 5/600/1400-hold 10/full/960-hold 15/off
(fire schedule for sheet copper)
Next I added a 2nd layer of powder and took it up to not quite a full
fuse, I wanted a raised look.
500/1350-hold10/full/960- hold 15/off
And there you have it a moose in the woods
|
| |
|
| |
#60 Monika Libor
 First
I would like to thank Brad for providing the Warmglass board and the
Warm Tips Section, which gives me the opportunity to learn everyday
about glass without having to travel and take classes. First
I would like to thank Brad for providing the Warmglass board and the
Warm Tips Section, which gives me the opportunity to learn everyday
about glass without having to travel and take classes.
This is the first time that I was able to take part in the Magless-Exchange,
and almost dropped out because the kiln-gods were not with me on two
runs (speak 100+ pieces), having trouble to get the material I needed
in my area, not enough time off from work etc
Thanks to Suzanne for her encouragement and setting my head straight
and getting me back on track again.
Loving chocolate (especially Belgian Chocolate) and having the insert
of one of those chocolate boxes to use as my master mold, just to try
it out, was the first step. Reading about pate de verre and color the
verre and curious to try it out to see were I can go with it was part
two. And thinking of my Grandma, my parents and all those delicious
fondant sugar sweets during Christmas time and on our Christmas tree
(oh sweet childhood) was part three.
Ingredients:
a. distilled water, plaster of Paris, silica flour (325 mesh)
b. Mold, Pam Spray, Cling Film, Tupperware or cardboard box
c. Glass, Frit, Powder, CMC, Mica, Airbrush, Hairspray
d. Hammer and news paper (to make Frit)
e. following Brads Book and casting guidelines (Warm Tips) and all the
other contributions on the Warmglass board about kiln casting,
f. Time, patients and a supportive spouse.
How to:
1. prepared mold, Clingfilm in cardboard box, master mold sprayed with
Pam,
2. mixing equal parts of distilled water, plaster and silica
3. pouring mold and releasing after it’s set and letting air dry
for 24hrs
4. using airbrush to apply mica on mold
5. filling molds with frit and powder in different layers and as high
as
possible
6. firing and cooling back to room temp (26 hrs)
7. checking, refilling and re firing,
8. Waiting, cleaning; and wishing for cold working equipment.
Firing Schedule (in my kiln Skutt GM1014): (wet mold)
I.) 200°- 225° hold 120min,
II.) 200°- 350° hold 120min,
III.) 200°- 850° hold 60min
IV.) 300°- 1050° hold 20min,
V.) 400° - 1375°hold 90min,
VI) 9999 to 950 hold 120min
VII.) 50 to 800 hold 30min,
VIII.) 50 to 700 hold 30min,
IX.)Let cool to room temp 12hrs+).
Reload and re-fire a lot faster since mold doesn’t have to dry,
but handle with care. Checking, cleaning, sorting and starting all over
again a few times.
What did I learn?
- have more material than needed; but I had fun smashing the glass to
make frit,
- start early if you have a day job, (more time to get more stuff)
- don’t loose patience and start over if the kiln gods fail me
again
- trusting my family if they tell me it looks “cool”
- And that take out isn’t that bad at all (if you don’t have
time to cook).
- Start saving to buy cold working equipment!
Monika # 60
*Be the Change you want to see in the World. (Mahatma Gandhi)*
|
| |
|
| |
#61 Larry Lunsford
|
| |
|
| |
#62 Dianne Van de Carr
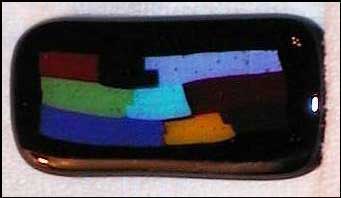
 I
made a new sheet of glass by fusing a base Bullseye 3304. I think it
was curious. The tiny pieces of dichroic were added across the surface
with tweezers, some face up and some face down. Then strips of 1441-50
were placed on top. It was fused to about 1440 with a 22 minute hold.
After the first fusing, I cut strips and then triangles with a "tile
clinker". That made cutting and breaking the strips much easier.
The center of the triangle was removed with my "ameritool"
saw. The corners were nipped off with a tile nipper. Then I grozed the
glass to smooth it further. No grinding. Then back into the kiln to
be fired again to 1440 with a 18 minute hold to round out the edges.
The big revelation for me this year was discovering that I could use
the tile clinker to cut and break glass. It has I
made a new sheet of glass by fusing a base Bullseye 3304. I think it
was curious. The tiny pieces of dichroic were added across the surface
with tweezers, some face up and some face down. Then strips of 1441-50
were placed on top. It was fused to about 1440 with a 22 minute hold.
After the first fusing, I cut strips and then triangles with a "tile
clinker". That made cutting and breaking the strips much easier.
The center of the triangle was removed with my "ameritool"
saw. The corners were nipped off with a tile nipper. Then I grozed the
glass to smooth it further. No grinding. Then back into the kiln to
be fired again to 1440 with a 18 minute hold to round out the edges.
The big revelation for me this year was discovering that I could use
the tile clinker to cut and break glass. It has
revolutionized how I cut thick glass.
|
| |
|
| |
#63: Michele Rubin
 Screen-Printed
Orcas Screen-Printed
Orcas
1. Cut and full fuse 2 layers of glass for bases. I used black irid
for the back piece and plain black DR for the top. The irid back insures
that the glass will not pick up any kiln wash during the fusings.
2. For the orcas, I made a silk screen that had 30 design elements in
a 6 x 5 layout on a 12” x 12” screen. I cut BE red DR to fit
within the screen dimensions. Black Paradise paint mixed with A-13 was
used for the printing. After printing the sheets of design elements
were fused at 1425 deg for 10 mins to mature the printed images. I did
not do anything to avoid devitrification and was pleased not to have
that problem.
3. The design elements were cut into strips by hand and then the individual
elements were cut on the bandsaw.
4. The design elements were placed on the bases and tack fused at 1385
deg for 8 minutes.
|
| |
|
| |
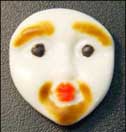
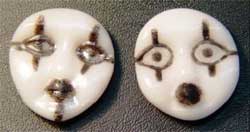
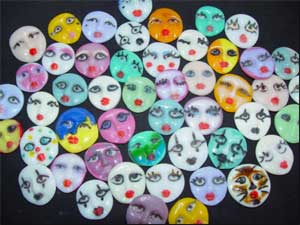
#65 Debra Young
 Made
7 casting molds for the faces Made
7 casting molds for the faces
Used hairspray or CMC (whichever was closest) mixed with opaque powder
frit for the details
The majority was backfilled with opaque powder frit and fired once
Lots of experiementing with frits and mica
Used 'Back Magic' on a few to get a luster like appearance
Some are unique and some are just plain homely but to say the least...no
two alike
Hope you enjoy them
|
| |
|
| |
#67 Susan Morita
|
| |
|
| |
#68 Loretta Brost
|
| |
|
| |
#69 Jeanette Bailor
 Project
Mica Experimentation - something other than airbrushed mica. Project
Mica Experimentation - something other than airbrushed mica.
Bullseye glass.
Bottom layer Tekta, although a few of the mags have clear rainbow irid
for the base as I had a scrap.
Next layer, strips of 1426 Spring Green and 4200 Black Mardi Gras.
On top of that are small squares of 0100 black. On these small squares
I experimented with various micas. All my micas were mixed with Klyr
fire, just a drop from the end of a toothpick on the black glass seemed
to be adequate to bond
the micas. Part of the experiment was making some juicier than others.
Some had the mica smooshed on and left uncapped, lending a rough mica
texture. Some had the mica completely capped with clear and those ended
up with depth, like a small gold nugget under water. Some had the mica
capped with clear slightly smaller
than the black square and that allowed the mica to creep out and up,
creating a small mica cavern. I think those bits were the most interesting
and afforded the most diverse appearance of depth. I did a single full
fuse firing on these.
I made sure there were no sharp points on any of the mags (some of the
mags that were partially uncapped grew a little sharp pointy thing out
the top). I decided to scribble a little bit of gold accents on the mags
to see how that would go with the mica, using Hanovia gold. Lessons learned
– I do not like the effect of silver micas, capped or uncapped. The various
golds and russets are interesting, each has good points. I really like
the depth you can get by capping and allowing creep out of the mica during
firing. This was an interesting experiment and I will use what I learned.
|
| |
|
| |
#70 JJ Jacobs
 The
result of waiting until it’s nearly too late, I quickly created
“Funky Town” out of various colors of Bullseye glass strips
and dichroic glass. In the beginning of this Magless adventure I attempted
to grind the bottoms of the little buildings to sit perfectly upon the
green strip of “grass” but due to time constraints quickly
gave up that idea and allowed the uneven bottoms to tilt where they
would, giving the towns their funky lop-sided look. Breaking the small
windows of dichroic glass was done by tapping the cuts with the ball
side of a tiny hammer and placing them on the buildings with tweezers.
I fired them in two different kilns to 1385 degrees. The
result of waiting until it’s nearly too late, I quickly created
“Funky Town” out of various colors of Bullseye glass strips
and dichroic glass. In the beginning of this Magless adventure I attempted
to grind the bottoms of the little buildings to sit perfectly upon the
green strip of “grass” but due to time constraints quickly
gave up that idea and allowed the uneven bottoms to tilt where they
would, giving the towns their funky lop-sided look. Breaking the small
windows of dichroic glass was done by tapping the cuts with the ball
side of a tiny hammer and placing them on the buildings with tweezers.
I fired them in two different kilns to 1385 degrees.
|
| |
|
| |
#71 Sandra McDonald
|
| |
|
| |
#72 Peggy Mattock
 Method
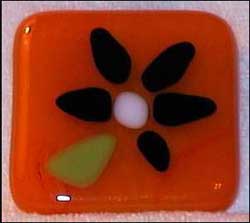
and Madness Method
and Madness
Take a lot of 150cm long 6mm diameter Schott rods (optically clear coe
91 glass), and snip into bits using mosaic cutters. Rest aching hand
round cold glass of wine.For a week.
Arrange 19 rod bits end up into hexagons. To prevent insanity ponder
on the maths - to make a hexagon with sides of X rods you need (3 x
(X2 – X))+1 rods. That’s why I stopped at the size I did –
though one lucky maglesseer will get a mag the next
size up, made of 37 bits of rod. Using a straight edge push the rods
together on all sides to make sure they’re touching. Fire to 820
(Celsius), hold 10 min.
Plonk each resulting hexagon on a bit of CBS dichro (all but one on
black) and fire again to the same temperature. The second firing softens
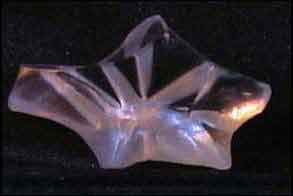
and rounds the rods much more than the first. Some mags got fired a
bit hotter, and are more rounded off than others. Some opened up like
flowers (OK, the edges sort of collapsed outwards).
Rinse and repeat.
Lessons Learned
Rods roll. Arranging the hexagons was a nightmare – and carrying
the shelf to the kiln very precarious. They look best when there are
widely varying lengths of rod - the clarity of the glass enhances the
dichro – you get flashes of colour at the rod ends when your perspective
changes. Unless you got one of the dark blue ones,
which aren’t as sparkly.
If your mag broke in transit fire as per Bullseye, a bit cooler than
usual at the top temperature and anneal a bit hotter, though at that
size I doubt it really matters.
|
| |
|
| |
#73 Matthew Lovein

|
| |
|
| |
#74 Jenefer Ham
|
| |
|
| |
#75 Amy Valuck
|
| |
|
| |
#76 Pam Damon
 There
are few variations on the "stamping with mica" theme All were
made with Bullseye glass and mica. There
are few variations on the "stamping with mica" theme All were
made with Bullseye glass and mica.
A piece of clear was stamped using Perfect Medium by Ranger, then sprinkling
mica this became the top glass.
The "star dust" magless was made with a star stamp: yellow
frit on clear glass topped with clear glass stamped with mica.
The "heart strings" was made with a heart stamp: pink or red
stringers on clear glass topped with clear stamped with mica.
The "hearts and stars" was made with a heart stamp: precut
star(s) on clear glass topped with clear glass stamped with mica.
The Kokopelli was made with a Kokopelli stamp: a precut star on clear
glass topped with clear glass stamped with mica.
What I learned was get started earlier I would have liked to do some
grinding and polish fusing but didn't have time, and use a stamp that
covers more area for a more defined look.
"star dust" I liked the looks
"heart strings" The stamp was lost in the strings
"hearts and stars" The precut stars retain their shape with
full fuse between two layers
"Kokopelli" I liked the look
|
| |
|
| |
#77 Susan Hutsko
 How
To For: How
To For:
Bobbi’s Sun Dancers
Glass used – Bullseye
French vanilla
Tetka
Mint green powder
Red powder
Black powder
Process
1. Make stencils for background wafers and sun dancers.
2. Prepare powder wafers - 126 background and 126 sun dancers. Firing
schedule – 600 degrees per hour to 1285, hold 10 minutes
3. Fuse French vanilla and tetka
4. Cut french vanilla/tetka sheet into 1 ½ inch squares with
band saw.
5. Grind edges as needed.
6. Place one background wafer and one sun dancer on each square and
fire.
Firing schedule:
Seg 1 400 hr to 1100 hold 15 minute
Seg 2 400 hr to 1425 hold 1 minute
Seg 3 9999 to 1100 hold 15 minute
Seg 4 100 hr to 960 hold 45 minutes
Seg 5 100 hr to 700 hold 1 minute
|
| |
|
| |
#79 Deb Compton
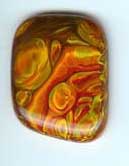
 First
a disclaimer: Everything I’ve learned, I’ve learned from
the board! This site was the most helpful for pot melts: First
a disclaimer: Everything I’ve learned, I’ve learned from
the board! This site was the most helpful for pot melts:
http://www.clearwaterglass.com/aperture_pour_test.htm.
Not all my photos or magless’ are from the same pot melt.
How To:
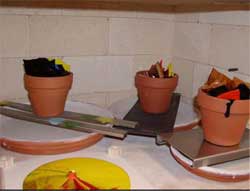
1. Load a flower pot with compatible glass. (Don’t put kiln wash
in the flower pot.) I didn’t enlarge the hole but you certainly
can.
This is how one of mine looked.
2. Prep the saucer with kiln wash. Set it up in the kiln so the glass
drips out onto the saucer. If you want the colors to remain separate,
I’ve found it helpful to keep
the flower pots close to the saucer. If you want the rings and a more
blended pot melt you can lift the saucer up.
3. Fire away!
1000 dph to 1700F, hold 60 min.,
AFAP to 1500F, hold 45 min.
AFAP to 960F hold 60 min
200 dph to 750F300 dph to 300F
Off
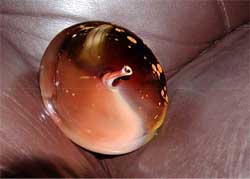
4. My pot melts came out with a “belly button,” probably
because I didn’t hold
long enough. (I consider it a happy accident.) To get rid of the belly
button I
put them back I the kiln with the next pot melt run and the result is
what looks
to be a combo “pot melt/high fire.” See below.
 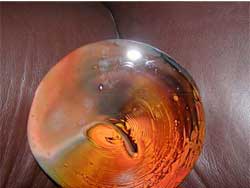
See how the orange comes to the surface? I think it’s more dramatic
after the second firing.
4. I cut the pot melts with the tile saw into sizes appropriate for
the magless. (The tile saw was plenty wet but I made sure that I kept
the pieces wet by immediately putting them in a bowl of water-I was
hoping to prevent grinder scum. Another tip from the board!) When they
were all cut I washed them with soap and water (“That product called
Dawn”), giving the edges an extra scrub.
5. I fired them once more to a full fuse-1480 degrees, annealed as
usual and “wala,” I present my 2006 magless!
Enjoy!
|
| |
|


