#80 – Tracy Field
 All
glass is spectrum 96. Cut bottom circle out of amazon green. Sprinkled
aqua glow dust on top of green then placed copper ghost cut-out over
it. Clear glass to cap. Cooked in kiln. Finished magless glows in the
dark! All
glass is spectrum 96. Cut bottom circle out of amazon green. Sprinkled
aqua glow dust on top of green then placed copper ghost cut-out over
it. Clear glass to cap. Cooked in kiln. Finished magless glows in the
dark!
|
|
#81: Pat Loboda
 I
used white, regular thickness BE 90 coe glass as the bottom layer, and
a layer of dark blue transparent thin BE glass as the top layer (sorry,
forgot to check the number before cutting it up). I was a little short
on the white, so I substituted a lavender opaque BE glass for the bottom
layer on a few maglesses. I full-fused these blanks as the first step.
What I Learned in this Step: I should have adjusted my programmed full-fuse
program. This program was obviously too hot for such little pieces of
glass, as I got some devit on them. Interestingly, I used I
used white, regular thickness BE 90 coe glass as the bottom layer, and
a layer of dark blue transparent thin BE glass as the top layer (sorry,
forgot to check the number before cutting it up). I was a little short
on the white, so I substituted a lavender opaque BE glass for the bottom
layer on a few maglesses. I full-fused these blanks as the first step.
What I Learned in this Step: I should have adjusted my programmed full-fuse
program. This program was obviously too hot for such little pieces of
glass, as I got some devit on them. Interestingly, I used
the same program for all the mags, but the few that had the lavendar
glass on the bottom --> the devit was worse than those with white
on the bottom.
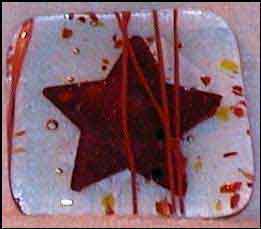
Frit Wafers:
My moons are frit wafers. I made a moon shape stencil from a thin plastic
to sift the powder through. First, I sifted a lemon yellow opal powder
(UR F1-356-8) through my moon-shape. Then I sprinkled BE Crystal Clear
(#1401-02) on top of the shapes. Then, I lifted my stencil. (It's easier
to lift if you make 2 "handles" from masking tape.) I dropped
2 or 3 drops of GlassTac onto each moon to holdthem together (I used
thinfire shelf paper on my kiln shelf). I let them dry overnight. These
were fired separately, of course.
What I Learned at This Step:
If the yellow powder layer was too thin, or too thick, the moons fell
apart. I like the sparkle of adding the larger crystal clear frit on
the top.
Assembly:
To the magless blank, I added a frit-wafer moon at the bottom, and 2
Wasser tiny stars at the top. I used GlassTac to adhere them. I let
them dry a couple hours,
and then put them through a light tack fuse program - for the Wasser
stars.
What I Learned at This Step:
Since Wasser is such a soft glass, & I wanted to keep the points
of the stars, I used a Wasser tack-fuse program. This worked well
for the stars, but a few of my moons didn't stick after this fuse. When
I refired those with the loose moons, the stars lost their points. Therefore,
this should
have been done in 2 steps: First, BE tack-fuse program for the moons;
and another firing - Wasser tack-fuse program for the stars. (Since
I came up with my idea so late, I didn't have time to do this in 2 steps
- bad me!)
Hope you enjoy my magnet! (And I especially hope that no moons popped
off during mailing!!!)
|
|
#83 Sue Sevcik
 Individual
Pot Melts Individual
Pot Melts
I used 2 1/2 inch pots and drilled the hole to a half inch.
Put 27 grams of glass in the pot.
Exponentiation said not too much dark colors and you needed some although
not a
lot of transparent to look good.
I put all the glass standing up in the pot.
Placed in kiln 11 at a time about 2 inches from the kiln shelf.Schedule:
AFAP to 1700
Hold 25 minutes
AFAP to 960
Hold 30 minutes
Turn off kiln
I don’t have a sandblaster so I soaked the melts in white vinegar
overnight and
scrubbed with a scotch bright. |
|
#84 Bill Pfeifer
|
|
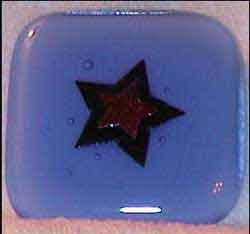
#85 Heidi Crowley
 Fully
fuse square base - layer standard thickness clear under thin deep cobalt
opal, topped with thin light sky blue transparent. Using squeeze bottles,
apply alternating squares of pink and jade green powder Fully
fuse square base - layer standard thickness clear under thin deep cobalt
opal, topped with thin light sky blue transparent. Using squeeze bottles,
apply alternating squares of pink and jade green powder
each mixed with Liquid Stringer Medium.
Using a toothpick, drag lines from center out to each corner. Drag
inward the
middle of each box side toward the center.
Finish with a dot in the center, and a dot at each corner pulled out
gently with
toothpick.
Fire to set the design (1360 degrees with no hold in my kiln).
|
|
#86 Carol Bauer
 Multi-Colored
Pyramid Magless Multi-Colored
Pyramid Magless
Construction consists of 5 layers
Bottom layers - 2 layers the same size, I used clear on the bottom and
topped with a primary opaque
Layers 3, 4 and 5 were contrasting opaques cut smaller by about 1/4
inch each
First fuse was a tack fuse
I am a pretty sloppy glasscutter so I cleaned up the edges on layer
1 and 2 with my Glastar grinder.
I then ground the pyramid using my bevel grinder
Then lots of scrubbing with a toothbrush and water and the final fire
polish fuse What I learned was about safety. I have done some grinding
but nothing on this scale. I usually grind with a filter mask and sometimes
safety glasses (I wear glasses and thought that would be enough) Not
so. After the first batch of 30 I had glass on my face and too near
my eyes for comfort. I also found that I had ringing in my ears.
I immediately went to my local home improvement superstore and purchase
decent eye and ear protection. I also upgraded the quality of my facemask.
I finished the mags safely.
|
|
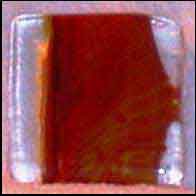
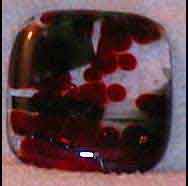
#87 Ross Wirth
 These
magless pieces really started as a way to use scrap glass from a stained
glass project. Not knowing the COE at the time, I decided it would only
be safe to fuse it to itself. Since the glass was orange streaky (orange-white
opal and orange cathedral) I guessed that a cut through the glass would
reveal color differences from the manufacturing process. I also loved
the red-shift when fused. When starting the magless project, I had just
about used up all the scrap when my first magless design ran into quality
and scaling problems. Therefore, I had to go out and buy more art glass
after wanting to use up what I had. These
magless pieces really started as a way to use scrap glass from a stained
glass project. Not knowing the COE at the time, I decided it would only
be safe to fuse it to itself. Since the glass was orange streaky (orange-white
opal and orange cathedral) I guessed that a cut through the glass would
reveal color differences from the manufacturing process. I also loved
the red-shift when fused. When starting the magless project, I had just
about used up all the scrap when my first magless design ran into quality
and scaling problems. Therefore, I had to go out and buy more art glass
after wanting to use up what I had.
Process – .25” strips were cut using a homemade jig
on my Morton cutting board (235 cuts). These were then cut to 1.75”
lengths using a mosaic cutter (probably over 1600 cuts given the trimming
and other mishaps). Each magless has 12 of these pieces set on edge
and fused together. The finished piece has bands showing a mix of transparent
and opal glass. Early gluing of some of the pieces was quickly abandoned
when it was discovered that none of the end pieces fell over if positioned
carefully.
What I learned:
- You can’t count on the red color shift when wanted. The new glass
held the orange color and did not give me the shift I was wanting. (Too
late, I had to
use up all the new glass)
- I now know what happens when my glass cutter gets dull. The roller
was probably already getting dull, but started producing really bad
breaks about half way through this project (235 linear feet of scores
were needed). After thinking that I was losing my touch or that the
opal mix was really troublesome on a particular sheet, I finally noticed
the quality of the score line. Seeing all the small side fissures, it
was no wonder that I wasn’t getting good breaks. Shifting to my
wife’s glass cutter got me back on track.
- The glass dealer later told me the glass was Spectrum and I have since
tested it as close, but not quite 96. Devit was not a problem, but about
10 to 15% of
each batch had one or more small white spots on the surface after fusing,
probably the result of not using a glass developed for fusing. Scratching
off the offending spot and refusing took care of the problem in most
cases. However, the second fusing did shift the transparent part of
the glass toward opaque while also producing nicer corners.
|
|
#89 Amy Davis
|
|
#90 Anne Meier-Davis
 Process: Process:
Cut one inch squares (hurray for strip cutters!) of white bullseye and
light turquoise GNA. Fired to full fuse with GNA on top. THAT was the
easy part!! I then cut out 500 *&^%$^$##* 1/3 inch triangular wings
out of a variety of thin, CBS dichroic. Then, lots of
little bodies out of GNA. Using good ole glue sticks, I glued the body
to a set of four wings – dichroic side up. Fired these in the rapid
fire kiln in batches of twenty to around 1500. The bodies were then
glued to the fired squares and fired again to a tack fuse- around 1450
in my kiln , which is a Skutt potters kiln – no top element, but
hey, it works! Amazingly enough, I had no breakage. This was a lot more
time consuming that I thought it would be. Mainly, cutting out the wings
took FOREVER and a lot more glass than I expected.
What I learned:
1. I don’t like dragonflies anymore.
2. Basset hounds will eat anything that hits the floor including glass
(fused, no sharp edges) and when it is 5:00 you WILL take them for their
walk. They don’t care if your firing is at a critical stage.
3. Dichroic with no texture works better on these.
4. Firing with the dichroic side up causes less shrinkage in the glass.
5. Too much glue leaves a stain on the glass.
6. Although bullseye and GNA are both COE90, Bullseye will start to
melt at a little bit lower temp.
7. Things this small have to be watched constantly. A few degrees difference
and you have something resembling a worm with a glandular problem.
|
|
#91 Julie Smoak
 Lay
7-9 stringers in channels of clear reed glass and tack fuse. Cut into
strips and then cut into right triangles. Arrange triangles into square
on base glass and fuse. What this 1st time magless maker learned: Lay
7-9 stringers in channels of clear reed glass and tack fuse. Cut into
strips and then cut into right triangles. Arrange triangles into square
on base glass and fuse. What this 1st time magless maker learned:
1. The channels in reed glass are not straight so using shorter width
pieces leads to a lot to ends to use in some other project (such as
mosaic magnets like 2-3 I had to include with the 2006 batch when I
had too many not quite
right ones).
2. Next time make 150 maglesses so I have plenty of spares if some aren’t
quite right!
|
|
#92 Pulaski Middle School
|
|
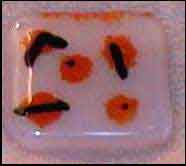
#94 Jackie Iverson
 Instructions Instructions
The grapes are a simple example of color blending. To make the dark
grapes I cut an equal number of 3/8” squares from Spectrum Light
Purple and Grape fusible glass. The squares were mixed together and
each grape is 2 squares that were
randomly selected from the pile. This created 3 different shades of
dark grapes; light purple, grape, and a mix of grape and light purple.
My first sample magless looked too dark, so I created the light grapes
to give more contrast in the cluster.
The light grapes were made by stacking a square of the colored glass
on a square of clear.
The finished magless is a square of Spectrum white with a cluster of
the rounded grapes selected at random using both light and dark. The
stem is Spectrum Butterscotch (fires Terra Cotta). In my kiln the grapes
came out nice and round
after 11 minutes at 1450º. The tack fuse for the magless was done
at 1350º held for 13 minutes.
Lessons learned:
• Start earlier and/or set an earlier date to switch to plan B
earlier. It was a mad rush to get these finished by the deadline and
I could not have done it without my husband’s help. The grape cluster
was my fall back when I could not get my first design to work. Now I
have a whole year to perfect it!
• Do a small batch run to test your construction techniques. I
thought I had a good, fast assembly line going and when they came out
of the kiln I discovered…
• Fusers glue does not burn off the surface of white glass at tack
fusing temperatures.
• When using clear to make the light grapes, cut the clear slightly
smaller than the colored glass. This will allow the color to flow over
the edge and avoid having a rim of clear on the finished nugget.
|
|
#95 - Jan Barker
 Glass Glass
2x2 squares of BE Tekta
Glassline Enamel for outline
Assorted BE powders mixed with Liquid Stringer Medium
(all opal except for the orange)
Lay-up
Bottom layer was blank
Top layer had design – fired design up
Schedule
Full fuse
What I learned
This was my first experimentation with powders in a medium. I did a
couple of prototypes and I knew I had to get more powder onto the glass
to get rich colors; the surprise was how much it pulled in during the
firing. I still like the painterly effect and am determined to work
it in to a much bigger piece.
Subjects – Princess parrots – native to Australia
and one of the most beautiful birds I have ever seen.
  Quality Control Department, aka Jools
|
|
#96 Cindy Johnson
|
|
#97 Alecia Helton
|
|
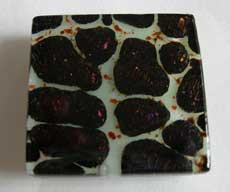
#99 Nancy Barry
 Assorted
Spectrum Baroques were used for the base glass. Assorted
Spectrum Baroques were used for the base glass.
Assorted Spectrum clears were used as the cap: waterglass, artique and
baroque
Thin shelf paper, Klyr-Fire and silver mica from Michael’s.
Star paper-punch
Paragon 22” front loading kiln
GOAL:
: To sandwich a mica impregnated fiber paper inclusion between 2 pieces
of Spectrum glass.
: To achieve a finished piece with little bubbling around the inclusion,
: To vary the firing schedule to achieve the best result at the lowest
temperature
Firing schedule:
#1: 500* per hour to 1150, hold 20 minutes, AFAP to 1465, anneal at
960 for 15 minutes.
#2: 500* per hour to 1175, hold 30minutes, AFAP to 1450*, anneal at
960 for15 minutes.
#3:500* per hour to 1175, hold 30, AFAP to 14450, hold 30 minutes, anneal
at 960 for 15 minutes.
The other variable was with the mica impregnated star. I started out
by soaking the star shaped fiber paper in the Klyr-Fire and then dusting
it in the mica like one would bread chicken. That seemed to produce
a star that was loaded with mica. With the second set, I mixed the mica
into the Klyr-Fire and then dunked the star shapes into this. While
the paper seemed to be loaded with mica, it turns out it that was not.
With the third set, I dusted dry star shapes with mica powder
and then dripped a drop of Kyle-fire into the center of the star after
it was on the base glass and then capped it. I changed how I was getting
the mica into the fiber paper because I did not like the results of
firing #1.
This kiln is a front loader. IT is very challenging to place 2 layers
anything in the back of the kiln and have the layers stay put. This
was the hardest part of the entire project.
Results:
I did finally achieve many tiles that had little or no air bubble around
the fiber paper inclusion. The mica remained. The other firings produced
more air around the star. The highest Temp of 1465* produced the most
bubbles and also caused devit on many pieces and sharp points on the
corners. That tells me it was too high. All of the pieces with CLEAR
BAROQUE as the cap experienced devit! This surprised me as I had hoped
that lowering the temp and soaking would
stop the devit from occurring.
Many of the tiles are visually challenged. I learn as much from the
imperfections as the ones that come out the way I expect. The goal was
to come up with a method of using a fiber paper/mica inclusion and having
as few bubbles as possible... I did get information that will allow
me to produce consistent results using lower temps and a soak... I will
not use Clear baroque until I figure out why it produces devit when
the other 2 clear usually do not. I sanded down the tiles that were
the worse looking and sprayed them with a clear, gloss lacquer to improve
their appearance. I did not have time to sand blast and fire polish.
|
|
#100 Andrea Raeburn
 This
year’s magnet project started with stenciling a Westies dog on
black BE with enamel. They looked flat and not very interesting. After
many trail and errors with various combinations of enamels, frit, and
glassline I ended up carving a dog in plaster to get a 3d effect.. I
then made a polyurethane negative mold and then polyurethane positive
mold with sides so that I could make multiple plaster negative molds.
I used 50/50 plaster silica mixture for the negatives molds. I found
by using hot water and the oven I could produce a new plaster negative
every 20 minutes. I ended up making two polyurethane molds to speed
up production to 6 per hour. This
year’s magnet project started with stenciling a Westies dog on
black BE with enamel. They looked flat and not very interesting. After
many trail and errors with various combinations of enamels, frit, and
glassline I ended up carving a dog in plaster to get a 3d effect.. I
then made a polyurethane negative mold and then polyurethane positive
mold with sides so that I could make multiple plaster negative molds.
I used 50/50 plaster silica mixture for the negatives molds. I found
by using hot water and the oven I could produce a new plaster negative
every 20 minutes. I ended up making two polyurethane molds to speed
up production to 6 per hour.
The plaster molds were then filled with BE frit mixed with CMC and
water. The three section of the mold (head, body and bow) had to be
filled separately and allowed to dry. This stopped the frit from mixing.
Laying in the frit mixture was a pain staking process requiring a lot
of patience. I used artists’ trowels to move the frit into place.
Trust me it was not as easy as it sounds. (Note: the frit mixture must
be thick enough so that when it shrinks in the kiln is does not separate
into blobs).
I then cut the glass for the backing for the Westie image and placed
it on the frit for firering. (Note: I should mention that when I made
the polyurethane mold I made a recess in the mold so that the glass
backing would just drop into place without having be positioned on the
frit. Without this you are positioning the glass blind.) I could fire
60 Westie at a time in my kiln.
Schedule 150ph to 600, 450ph to 1450 hold 30min, off.
The plaster molds must be broken away from the glass after firering.
There is a lot of plaster that must be remove and it sticks like you
know what! I found by soaking the glass in vinegar and then using a
brass wire brush it all came off.
I then ground to remove any spars and the nose and eyes were painted
on with enamel and then fire polished. The fire polish schedule was
450ph to 1300 off.
I don’t really understand why but some of the dogs came out dull
after the fire polish. To make them all look the same I sprayed them
all with a coat of clear acrylic
Some of you got white Westie dog and some got black Scottie dogs, just
luck of the draw, I ran out white frit so I switch to black.
|
|
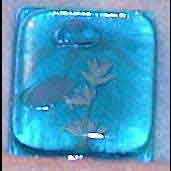
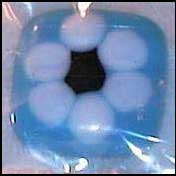
#102 Zane Rozkalns
 Using
System96 glass, I cut bluegreen squares for the bottom and clear for the
cap. Each piece had 4 chads too....very tiny ones. I cut and shaped 20
gauge tinned copper wire parts. Then I matched similar parts and
assembled them on the bluegreen square with hairspray to hold the wire
in place, although I flattened some of the tiny straight pieces
otherwise they tended to roll off. The design comes from a Latvian
symbol meaning moon. It is easier to understand if you think of the four
quarters of the moon. Using
System96 glass, I cut bluegreen squares for the bottom and clear for the
cap. Each piece had 4 chads too....very tiny ones. I cut and shaped 20
gauge tinned copper wire parts. Then I matched similar parts and
assembled them on the bluegreen square with hairspray to hold the wire
in place, although I flattened some of the tiny straight pieces
otherwise they tended to roll off. The design comes from a Latvian
symbol meaning moon. It is easier to understand if you think of the four
quarters of the moon.
Things I learned:
1. The older you get the clumsier fingers are with tiny pieces.
2. lengths of wire must be as exact as possible, but having a perfect
match of all similar pieces is impossible.
3. Longer firing at lower temperature is better than faster firing at a
higher temperature.
4. Firings must be watched more closely than grandchildren. " Wait a
minute, I am busy. " does not work and results in overfiring in just
minutes.
|
|
#103 Elizabeth Woros
|
|
#105 Bob Leatherbarrow
|
|
#106 Jim and Jayne Simmons
|
|
#107 Judi Goloff
|
|
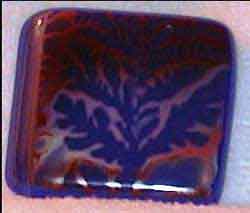
#109 Terry Arter
 1.
BE Deep Royal Blue 1.
BE Deep Royal Blue
2. With toothbrush (wear a mask!), spatter left side with Ferro Sunshine
Cardinal, right side with Lemon, fire to 1100 to stick.
3. With nozzle applicator bottle, draw swirly design with Purple Red,
fire to 1100. This did not turn out very well - turned out more of a brown.
4. Draw swirly/dash pattern with Ferro Sunshine Green, fire to 1100.
5. Apply clear cap, fire to 1400. |
|
#112 Elizabeth Villareal
|
|
#114 Jenny Smith
|
|
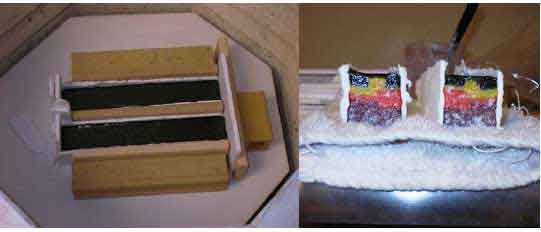
#115 Sandy Chisolm
 Rorschach
Tiles – Rorschach
Tiles –
How to ....
The following describes the process I use to make them. Virtually all
of what I describe can be modified with generally predictable results.
 Start
by building a dam. I use 2” high strips of ¾” vermiculite
board (a refractory grade material which cuts/works like wood) fastened
together with 3” SS screws to create a dam with an internal cavity
of 6” X 6” X 2”. I line the interior walls with 2”
strips of 1/32” thin fiber paper (NOT to be confused with Bullseye
Thinfire paper, an otherwise outstanding product not appropriate for
this application) secured to the board with 25 gauge high temperature
(Ni-Chrome) wire; this insulation makes disassembly (and reuse) of the
dam walls easier. Start
by building a dam. I use 2” high strips of ¾” vermiculite
board (a refractory grade material which cuts/works like wood) fastened
together with 3” SS screws to create a dam with an internal cavity
of 6” X 6” X 2”. I line the interior walls with 2”
strips of 1/32” thin fiber paper (NOT to be confused with Bullseye
Thinfire paper, an otherwise outstanding product not appropriate for
this application) secured to the board with 25 gauge high temperature
(Ni-Chrome) wire; this insulation makes disassembly (and reuse) of the
dam walls easier.
 Place
the dam upon a kiln shelf which has been well-covered with several coats
of wash. Fill this dam with pieces of glass of your choice. I use pieces
with a surface area of approx 1” square with little concern for
the shape; different sizes will prompt different patterns. This is a
wonderful opportunity to use scrap/broken pieces &/or previously
fused but unused or discarded elements (“Don’t refuse to re-fuse!”).
A 36”sq. dam (above) will hold approx. 1500 gms. of glass (because
of the substantial variability of weight/area of art glass, a very approximate
equivalent is two ft.sq.). While this charge is intended to reach the
brim of the dam, the height of this glass will, upon melting, fall by
about half to approx. 1”, to occupy all the free (air) space originally
occupied by the glass shards. Place
the dam upon a kiln shelf which has been well-covered with several coats
of wash. Fill this dam with pieces of glass of your choice. I use pieces
with a surface area of approx 1” square with little concern for
the shape; different sizes will prompt different patterns. This is a
wonderful opportunity to use scrap/broken pieces &/or previously
fused but unused or discarded elements (“Don’t refuse to re-fuse!”).
A 36”sq. dam (above) will hold approx. 1500 gms. of glass (because
of the substantial variability of weight/area of art glass, a very approximate
equivalent is two ft.sq.). While this charge is intended to reach the
brim of the dam, the height of this glass will, upon melting, fall by
about half to approx. 1”, to occupy all the free (air) space originally
occupied by the glass shards.
(About colors: as with a pot melt, you should use dark ones (particularly
black) very sparingly as they tend to overwhelm the others disproportionate
to their volume. And, while this process works not-at-all with cathedral
glass (Yuck!), blending nuggets of clear with the opals can create some
particularly interesting windows which draw attention to the tile’s
depth, similar to cat’s eye marbles.)
 Prior
to the manipulation, the kiln shelf should be steadied within the kiln,
either by placing it directly on the kiln floor &/or buttressing
the shelf against the kiln walls. During manipulation, drawing the tools
through the inch-thick molasseslike consistency of the molten charge
may cause the shelf to become unsteady or shift were it simply sitting
on short posts (the dam containing the charge needs no such bracing).
Additionally, during manipulation, your tools should approach the bottom
of the glass charge, but you should be mindful not to scratch the kiln
shelf and draw any of the dislodged material (wash) or fiber wall liners
into the glass. Prior
to the manipulation, the kiln shelf should be steadied within the kiln,
either by placing it directly on the kiln floor &/or buttressing
the shelf against the kiln walls. During manipulation, drawing the tools
through the inch-thick molasseslike consistency of the molten charge
may cause the shelf to become unsteady or shift were it simply sitting
on short posts (the dam containing the charge needs no such bracing).
Additionally, during manipulation, your tools should approach the bottom
of the glass charge, but you should be mindful not to scratch the kiln
shelf and draw any of the dislodged material (wash) or fiber wall liners
into the glass.
Now the fun/art begins! This is one of very few interactive fused glass
process which are conducted at temperature, and all the appropriate
safety considerations regarding eye and clothing protection should be
observed. The charge is heated to approx. 1700 deg. F. As there is no
threat of thermal shock to the shards, fire at the maximum rate of which
your kiln is capable. Upon reaching temperature, the molten mass of
glass can now be manipulated with the same metal-tipped tools which
would be used for combing. Cooling these tools in an ice water bath
will help retard the annoying adhesion of the glass to the metal tips
and singeing the
wooden dowels to which they may be attached, which will occur in a matter
of seconds, so … work quickly! After mixing the shards in a combing-like
fashion, close the kiln lid, return the tools to the ice water bath,
allow several minutes for the molten charge to return to working temperature
(1700 deg. F.), and repeat as often as your artistic sense suggests.
The frequency and direction of your combing passes (along with the original
size and distribution of the glass shards) will determine the internal
pattern you create; as usual, experience will be your best guide. When
done manipulating, allow the mixture to remain several minutes at temperature
before ramping down, to allow the surface of the charge to settle and
any bubbles introduced to return to the surface.
Crash cool to the annealing stage, which should be extended to reflect
the substantial thickness of the glass block. The System 96-recommended
schedule is as follows: (rate/target temperature/hold time)
- 9999/1700/one hour (quick ramp; long hold – time to manipulate)
- 9999/1000/15 (allow some time here to stabilize)
- 500/950/two hours (a “lengthy” anneal, with a gentle decline
through the annealing range)
- 30/800/13
- 50/700/10
- 250/100/off
 Constructed
in this fashion, an uncut glass block is like Forrest Gump’s box
of chocolates; until you “bite” into one, you never know what
you’re going to get! The discovery (tasting) is a large part of
the fun. The photo(R) illustrates the cooled block, which has been top-lapped
and trimmed on three sides. I use a MK-100 tile saw with a 10”,
.032 width Result multipurpose diamond blade supported by 6” aluminum
wheel stiffeners. The cooled block is cut into ¼ inch-wide slices
to reveal the interior “pattern”. The pictured block yielded
22 slices; because I usually set aside the less-figured outer ends (for
a pot melt or other reuse), I was able to create 10 paired sets. Constructed
in this fashion, an uncut glass block is like Forrest Gump’s box
of chocolates; until you “bite” into one, you never know what
you’re going to get! The discovery (tasting) is a large part of
the fun. The photo(R) illustrates the cooled block, which has been top-lapped
and trimmed on three sides. I use a MK-100 tile saw with a 10”,
.032 width Result multipurpose diamond blade supported by 6” aluminum
wheel stiffeners. The cooled block is cut into ¼ inch-wide slices
to reveal the interior “pattern”. The pictured block yielded
22 slices; because I usually set aside the less-figured outer ends (for
a pot melt or other reuse), I was able to create 10 paired sets.
 It
is critically important to the Rorschach process that, going forward,
the sequence and orientation of the cut slices be maintained, or else
the symmetry that the process depends upon is compromised/destroyed. It
is critically important to the Rorschach process that, going forward,
the sequence and orientation of the cut slices be maintained, or else
the symmetry that the process depends upon is compromised/destroyed.

 These
slices can then be lightly trimmed by a flat lap machine or a surface
grinder, to assure that the pairs, when joined, fit together cleanly/snuggly.
Because the top surface is where the pairs are joined, it is the top
surface (only) which benefits from being lapped or ground; the bottom
tends to be very flat in any event. The grinder set-up shown in the
photo, which includes an adjustable gate/fence screwed into the grinder’s
surface, is an extraordinarily useful arrangement for These
slices can then be lightly trimmed by a flat lap machine or a surface
grinder, to assure that the pairs, when joined, fit together cleanly/snuggly.
Because the top surface is where the pairs are joined, it is the top
surface (only) which benefits from being lapped or ground; the bottom
tends to be very flat in any event. The grinder set-up shown in the
photo, which includes an adjustable gate/fence screwed into the grinder’s
surface, is an extraordinarily useful arrangement for
grinding straight lines, parallel lines and/or other consistent, regular
shapes (squares). Note also the tube through which flows fresh water
directly onto the face of the grinding head (not shown is a similar
tube attached to the grinder base for the continual discharge of waste
water).
 Paired
sets are created by “book ending” slices. This is done by
taking adjacent pairs and abutting their top surface (lay the right
slice down on its left side, and the left slice down on its right
side). Because combing of the molten charge is conducted from the
top surface (no kidding?), it is the top of the block which tends
to be more “figured” than the bottom and the sense of symmetry
is enhanced by this orientation. While you may be initially disappointed
with the seeming lack of symmetry the process shows when you view
these paired sets from the top, you will find the symmetry is substantially
greater when you observe their underside (go ahead … peek!).
After all, it is the underside faces which were closest together before
being sliced apart. I separate/surround these pairs with glass strips
and mullite dams before I return them to the kiln for a second, more
“ordinary” firing cycle: Paired
sets are created by “book ending” slices. This is done by
taking adjacent pairs and abutting their top surface (lay the right
slice down on its left side, and the left slice down on its right
side). Because combing of the molten charge is conducted from the
top surface (no kidding?), it is the top of the block which tends
to be more “figured” than the bottom and the sense of symmetry
is enhanced by this orientation. While you may be initially disappointed
with the seeming lack of symmetry the process shows when you view
these paired sets from the top, you will find the symmetry is substantially
greater when you observe their underside (go ahead … peek!).
After all, it is the underside faces which were closest together before
being sliced apart. I separate/surround these pairs with glass strips
and mullite dams before I return them to the kiln for a second, more
“ordinary” firing cycle:
- 400/1000/0
- 9999/1465/10
- 9999/1000/8
- 300/960/20
- 200/800/0
- 400/120/off
 When
you remove the piece from the kiln and clean away the kiln wash or paper,
you will find a dramatic (positive) difference between the bottom side
pattern and the top side. While the top side currently sports a shinier,
fired finish, these pieces are intended to be reversed and will almost
certainly be further incorporated into a larger plate/bowl/dish arrangement
and refired (during which process, the rough/shiny texture distinction
will also be reversed). At this point, (after you saw to separate the
several (10) matched pairs) the Rorschach process is largely complete.
Depending on your trimming, slicing and grinding, the above project
could yield as many as 30 (10 bars X 3 ea.) 1.75”sq. tiles. Your
yield may fall, however, if you elect to irregularly trim the bars to
capture some particularly fascinating figure, &/or you may elect
to discard some whole bars altogether. Now is the time to closely examine
these slices in order to capture what you think are the most interesting
images which you’d like your audience to “see”. While
some will doubtless be more interesting and pleasing than others, I
feel certain that you will consider many/most to be simply and literally
“fantastic”. When
you remove the piece from the kiln and clean away the kiln wash or paper,
you will find a dramatic (positive) difference between the bottom side
pattern and the top side. While the top side currently sports a shinier,
fired finish, these pieces are intended to be reversed and will almost
certainly be further incorporated into a larger plate/bowl/dish arrangement
and refired (during which process, the rough/shiny texture distinction
will also be reversed). At this point, (after you saw to separate the
several (10) matched pairs) the Rorschach process is largely complete.
Depending on your trimming, slicing and grinding, the above project
could yield as many as 30 (10 bars X 3 ea.) 1.75”sq. tiles. Your
yield may fall, however, if you elect to irregularly trim the bars to
capture some particularly fascinating figure, &/or you may elect
to discard some whole bars altogether. Now is the time to closely examine
these slices in order to capture what you think are the most interesting
images which you’d like your audience to “see”. While
some will doubtless be more interesting and pleasing than others, I
feel certain that you will consider many/most to be simply and literally
“fantastic”.
Hmm … now, what to do with all this “scrap”?!
|
|
#119 Joanne Coughlin
 I
started thinking about my design even before I was able to sign up,
but what I had planned didn’t work out, so, on to plan B. Maybe
next year. All of my ‘maglesses’ are approximately 2”
X 2”, Bullseye Fusible. Some have a clear cap of BE or Wasser.
Some have the clear underneath. I was able to complete the 125+ maglesses
in 3 batches. My kiln shelf held about 48 maglesses per firing. The
1st batch consists of The BE base piece, a piece of multi-colored Wasser
and 1 or 2 copper images (punched out with a paper punch) included,
with the clear cap on top. These came out with a few bubbles, and were
not fully fused. (cone 017) (I’m still learning the my kiln). The
2nd batch was abstract designs built with Wasser glass and stringers,
most with a clear cap. I had some problems getting the cap to sit straight
and stay on top of the ‘pile of glass’ designs. I decided
to fire most of them without a cap and fire again with the clear cap
after the design flattened out in the 1st firing. That seemed to work
better. It also eliminated the bubbles. The 3rd batch was much like
the 2nd, abstract designs, etc. These were fired to a cone 015, which
shut the kiln off at 1450 degrees. They came out quite nicely, fully
fused & very colorful! I
started thinking about my design even before I was able to sign up,
but what I had planned didn’t work out, so, on to plan B. Maybe
next year. All of my ‘maglesses’ are approximately 2”
X 2”, Bullseye Fusible. Some have a clear cap of BE or Wasser.
Some have the clear underneath. I was able to complete the 125+ maglesses
in 3 batches. My kiln shelf held about 48 maglesses per firing. The
1st batch consists of The BE base piece, a piece of multi-colored Wasser
and 1 or 2 copper images (punched out with a paper punch) included,
with the clear cap on top. These came out with a few bubbles, and were
not fully fused. (cone 017) (I’m still learning the my kiln). The
2nd batch was abstract designs built with Wasser glass and stringers,
most with a clear cap. I had some problems getting the cap to sit straight
and stay on top of the ‘pile of glass’ designs. I decided
to fire most of them without a cap and fire again with the clear cap
after the design flattened out in the 1st firing. That seemed to work
better. It also eliminated the bubbles. The 3rd batch was much like
the 2nd, abstract designs, etc. These were fired to a cone 015, which
shut the kiln off at 1450 degrees. They came out quite nicely, fully
fused & very colorful!
WHAT I LEARNED…
I learned that even though I am a terrible procrastinator, my love for
glass helped me BEAT that nasty procrastinator bug! There IS HOPE for
me yet! (Do
you think that will work for ‘the bills’ ???). I also learned
a lot about my kiln. I have been afraid of it, but I’m more confident
with it now. If my project didn’t turn out how I wanted it in the
first firing, fire again! I learned from my mistakes, as well as my
triumphs! “Never refuse to re-fuse!” (per one of my fusing
instructors at a workshop). I hope you enjoy my magless. I don’t
have a whole lot of experience, so they aren’t as terrific as the
others I have seen, but that will come with time, right? I can’t
WAIT to see the one YOU made! Thank you all!
Joanne Coughlin
Downunder Glassworks
6505 Beverly Blvd
Everett, WA 98203-5205
Downunder_Glassworks@verizon.net |
|
#120 Steven Schramek
 The
idea for our “Footprints” magnets is drawn from the famous
“Footprints In the Sand” poem. But it is truly inspired by
our beautiful Florida beaches. The Tampa Bay area boasts two of the
top ten beaches in the United Sates, Fort DeSota Beach and Caladesi
Beach. And both are only miles from our home. The
idea for our “Footprints” magnets is drawn from the famous
“Footprints In the Sand” poem. But it is truly inspired by
our beautiful Florida beaches. The Tampa Bay area boasts two of the
top ten beaches in the United Sates, Fort DeSota Beach and Caladesi
Beach. And both are only miles from our home.
Recipe for “Footprints”.
Take two 2” squares of 3mm clear glass. ½ teaspoon of beach
sand. A stationary punch and some copper foil. Heat to 1450 degrees
and voila! You have a “Footprints” mag.
Enjoy!
|
|
#121 Dotti Bernsten
 Mesh
Melt Mesh
Melt
The first melt I tried ended up with the mesh bonded into the top surface
of the glass below. I had not anchored the mesh very well at the sides,
so it actually sagged and fell right into the melted glass itself! Not
pretty and not what I was
hoping for.
For the second attempt, I bought extra kiln furniture and anchored
¼” steel mesh about 6” above clear sheet (dammed).
I loaded the glass on top of the mesh, and added a few pieces of gold
foil to see what would happen (only a few pieces actually have bits
of gold showing, otherwise it seems to have disappeared, though I did
cap each piece with clear in the lay up). Took the kiln to 1675 for
one hour, took a peek to see if the mesh held in place (it did) and
to see that all the glass had melted through the mesh, then annealed
per usual. When cool, I cut the pieces up into triangles. I thought
that I could cut the pieces into wide strips, then into triangles by
hand using my industrial breaking pliers. No go – some of the pieces
have uneven and “oystered” edges (some are pretty deep), so
I decided to cut everything on the tile saw. I have no automated cold
working equipment so I used diamond hand pads to smooth all the edges.
That took hours and hours and many hand cramps. Then the pieces were
brought slowly to 1275 to fire polish.
|
|
#122 Barb Ridgley
 I
used Spectrum System 96 Medium Blue Opal glass, and clear glass. I cut
them into squares. I full fused the clear on top of the blue. After
that, I took Cotton Candy Pink Opal and smashed it up into frit. This
was used for the long tall flowers. I then used white stringer, and
a candle, and created the daisy flower petals. By pulling the stringer
over the candle, I ended up with a pointed side, and then cut the other
end blunt to make them look like daisy petals. For the rounded petals,
I took white stringer and put small pieces in the kiln during the full
fuse firing which caused it to roll up. The longer the hold, the more
ball shape the petals became. The stems and leaves were created by pulling
green stringer over the candle to make very thin stringer, and then
leaves. Marigold frit was used for the centers of the flowers. All was
held in place with hairspray while they were transported to the kiln
for a tack fuse. I
used Spectrum System 96 Medium Blue Opal glass, and clear glass. I cut
them into squares. I full fused the clear on top of the blue. After
that, I took Cotton Candy Pink Opal and smashed it up into frit. This
was used for the long tall flowers. I then used white stringer, and
a candle, and created the daisy flower petals. By pulling the stringer
over the candle, I ended up with a pointed side, and then cut the other
end blunt to make them look like daisy petals. For the rounded petals,
I took white stringer and put small pieces in the kiln during the full
fuse firing which caused it to roll up. The longer the hold, the more
ball shape the petals became. The stems and leaves were created by pulling
green stringer over the candle to make very thin stringer, and then
leaves. Marigold frit was used for the centers of the flowers. All was
held in place with hairspray while they were transported to the kiln
for a tack fuse.
Lessons Learned: I had read that you could make round dots by
holding stringer over a candle, but I tried and tried, and I was never
able to get a round dot to fall off a white stringer! I sat there for
10 minutes once trying! Instead, I ended up putting small stringer pieces
into kiln to get the round petals. Placing the round balls on the maglesses
presented a challenge too. I tried to put the pieces really close to
the edge, and it was the sloping edge of the magless. When they are
fired, they just roll off!! I tried many different types of glue and
hairspray, and none would defy gravity! It would have been better if
I had done the initial full fuse with clear on the bottom, flipped them
to put my design on the flatter surface, and then tack fused.
|
|
#123 Eugene Lohman
 I’ve
been exploring how cold-working transforms glass and decided to make
my magless collection using simple cold-working techniques. It has become
clear to me that a piece of glass that is simply fused looks quite different
after it is cut and cold-worked. Before cutting and cold-working, a
fused piece of glass looks, to me, as if it is bound by its own surface.
It is contained by
its boundaries. It stops at the surface. I’ve
been exploring how cold-working transforms glass and decided to make
my magless collection using simple cold-working techniques. It has become
clear to me that a piece of glass that is simply fused looks quite different
after it is cut and cold-worked. Before cutting and cold-working, a
fused piece of glass looks, to me, as if it is bound by its own surface.
It is contained by
its boundaries. It stops at the surface.
By contrast, cutting and cold-working the glass, to my way of seeing
it, removes this boundary of self-containment. The glass seems to be
released from its own bonds. Light can penetrate this cut surface and
since this boundary no longer exists, light can escape from the interior
of the glass as well.
|
|
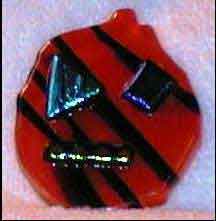
#124 Brad Walker
 These
were unbelievably easy to do, but they did involve several steps.
First, I created squares using various techniques. The stripes,
for instance, were made by laying stringer into reed glass, then capping
with clear and fusing. The mottled colors were from powder
sprinkled on a base glass, then covered with frit and fused. These
were unbelievably easy to do, but they did involve several steps.
First, I created squares using various techniques. The stripes,
for instance, were made by laying stringer into reed glass, then capping
with clear and fusing. The mottled colors were from powder
sprinkled on a base glass, then covered with frit and fused.
Once I had made a lot of squares of various types (different color
stringers, different color and size frit and powder), I fused all the
squares together (like a checkerboard). Then I used a tile saw to
cut randomly into triangles, cleaned and fire polished. No two
pieces are alike. |
|
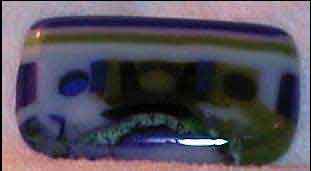
#125 Suzanne Mueller
 Pattern
bar Maglesses or Mesa Sunset Pattern
bar Maglesses or Mesa Sunset
I used Bullseye this year. The pattern bars were 11 layers.
Firing Schedule for Pattern Bars:
The firing schedule for the bars is 300 dph to 1000º hold 10 minutes
800dph to 1475º hold 30 minutes
afap to 960º hold 3 hours
60dph to 750º no hold
let the kiln cool by itself to room temp.
Tile saws seem to be very in this exchange…after seeing my initial
cuts my sweet husband volunteered to finish cutting them for me. Cut
¼” thick.
I grinded the edges of each piece. Washed and scrubbed thoroughly to
get all the scum from the saw blade and grinder off.
 Firing
schedule for cut pieces: Firing
schedule for cut pieces:
700dph to 1450º hold 30 minutes afap to 1000º
let the kiln cool by itself to room temp.
What I learned:
1. If your husband says, “Don’t you want to get the 10”
tile saw instead of the 7”?”, say, “Yes!”
2. It doesn’t matter how well you think you’ve sanded, cleaned
and kiln washed the shelf, if you are doing maglesses, the kiln wash
will stick. I think part of it may have been I didn’t have a high
enough temp on the
bottom two shelves.
3. If you think you have them clean, clean them again.
4. One hundred
+ boxes takes up a lot more space than what I thought.
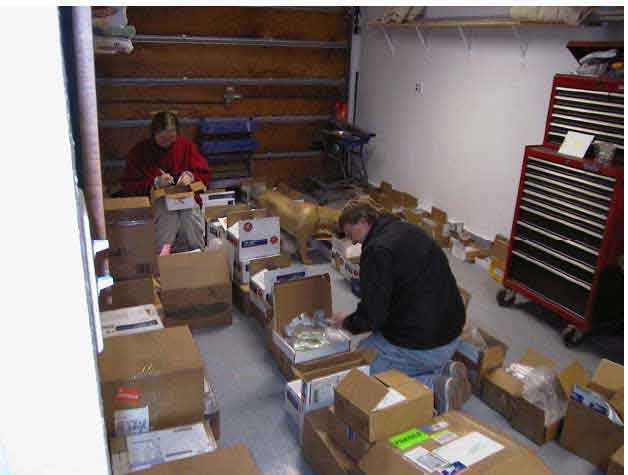
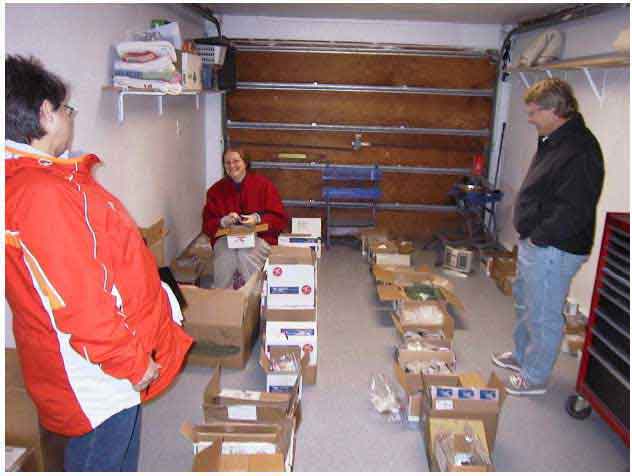
5. Kent (left) and Lorraine (right) Allen are absolutely super people!
Without them, my husband and our friend Chris Terkla, the exchange would
have been a complete disaster. These folks came over the weekend of
the deep freeze. Lorraine came over the following Monday and we were
able to actually start sorting. They are coming back tomorrow, Saturday
2/25, with a pot of chili and beer. .
6. Barbara Cashman and Rosanna Gusler are generous with their knowledge
of the art of Magless coordinating and sorting. Many thanks to both
of them for their moral support!
7. The Warm Glass Community is a warm and wonderful bunch.
|
|
